Maker Space Magic: Visual Invention Journals

Picture this: your maker space walls transformed into living, breathing journals where every invention attempt, every “beautiful oops,” and every breakthrough moment gets celebrated in poster-sized glory. That’s exactly what we’re creating in my first-grade classroom, and I can’t wait to share how our classroom poster maker invention journals have revolutionized the way my little engineers document their creative process!

Why Wall-Sized Invention Journals Transform Learning

When I first started using our Classroom Pro 24 Poster Maker Elite Package for maker space documentation, something magical happened. Students who once rushed through their design process suddenly slowed down, eager to document each step on our oversized poster pages. The visibility of their work—displayed proudly at their eye level—transformed not just their approach to inventing, but their entire mindset about learning from mistakes.

Close-up view of a first grader's hands drawing on a large poster journal page using colorful markers. The poster shows a simple invention sketch (maybe a cardboard robot or bridge made from

Traditional notebooks hide the messy, beautiful process of invention. However, when we use our poster maker machine for school projects, every sketch, every failed prototype, and every “aha!” moment becomes part of a collaborative visual story. My six and seven-year-olds now see their classmates’ invention journeys unfolding in real-time, sparking conversations like “How did you solve that problem?” and “Can I try your idea with my project?”

Setting Up Your Classroom Poster Maker Invention Journals

Materials You’ll Need

Getting started is simpler than you might think! Here’s what I use:

Large poster paper (36″ x 24″ works perfectly)
Colorful markers and crayons
Glue sticks for adding photos
Washi tape for borders
Clear wall pockets for 3D elements
• Your trusty poster printer

Organization Tips

I’ve learned that success lies in the setup:

Dedicate wall space at student height
Create sections for each project phase
Use consistent templates for each journal page
Label everything with pictures and words
Rotate displays monthly
Keep supplies accessible in labeled bins

Creating Reusable Invention Process Posters

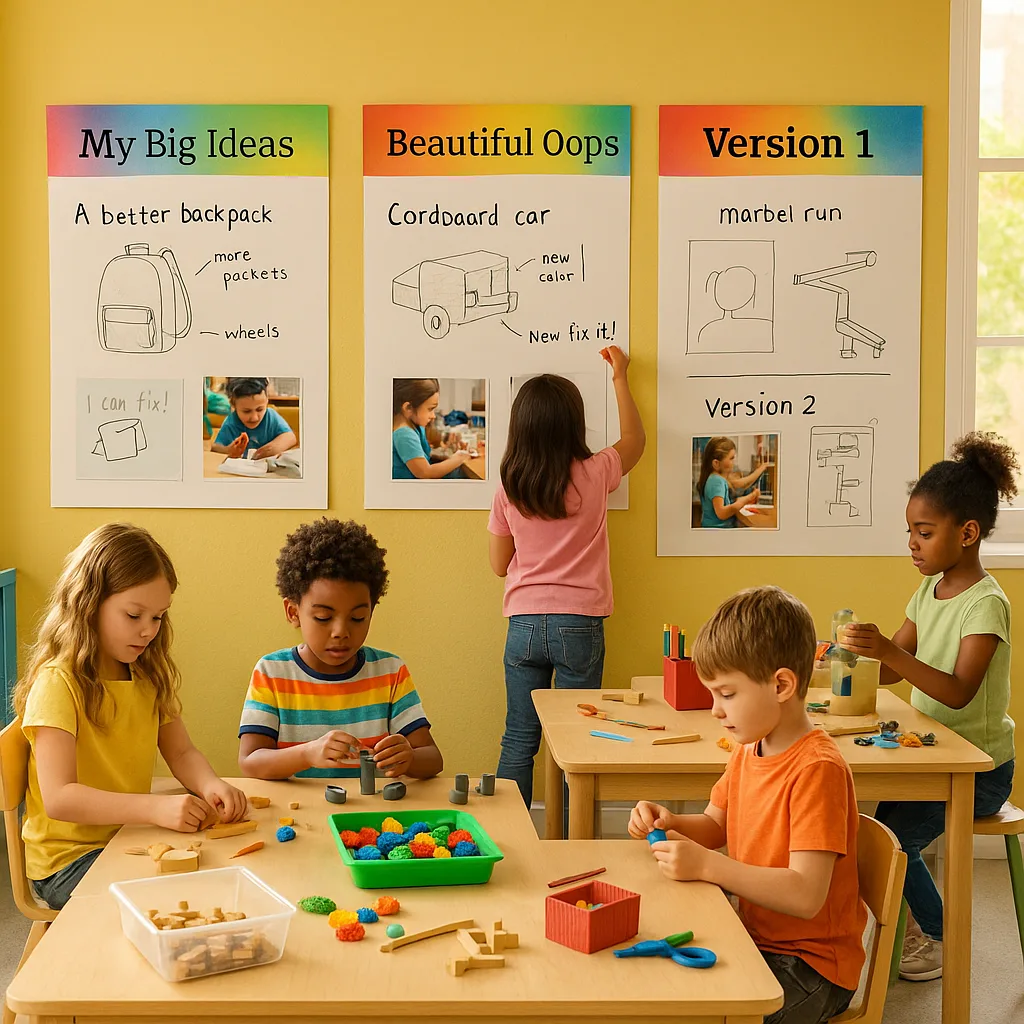
One of my favorite discoveries this year has been creating laminated, reusable invention process posters. Using our Amplify Poster Maker, I design templates that students can write on with dry-erase markers, photograph for their portfolios, then wipe clean for the next project. This sustainable approach has saved countless sheets of paper while teaching my first graders about environmental responsibility.

Template Sections That Work

Through trial and plenty of error (celebrated on our failure wall, of course!), I’ve developed template sections that really resonate with young inventors:

1. “My Big Idea” Box: A large space at the top where students draw or describe their initial concept. I encourage them to think big—literally!

2. “Materials I Need” Checklist: Visual representations help non-readers participate fully. Students love checking off items as they gather supplies.

3. “My First Try” Documentation: This section celebrates the messy reality of first attempts. Photos, sketches, and honest reflections live here.

4. “What Didn’t Work (Yet!)” Section: That “yet” is crucial—it transforms failures into stepping stones rather than roadblocks.

5. “New Ideas From Friends” Space: Collaboration is key! Students document suggestions and adaptations inspired by peer feedback.

6. “My Final Creation” Showcase: The grand finale includes photos, measurements, and proud artist statements.

85%

Success Rate: Students completing multi-step invention projects when using visual journals

Celebrating Failures: The “Beautiful Oops” Wall

Perhaps the most transformative addition to our maker space has been our “Beautiful Oops” wall—a dedicated space where failures are not just accepted but celebrated as essential steps in the invention process.

I use our classroom poster maker to print colorful frames for each “oops moment.” Students document what went wrong, what they learned, and what they’ll try next. These posters have become some of our most visited displays—students often reference past failures when facing new challenges.

Student Confidence Growth 92%

After implementing our Beautiful Oops wall, students show increased willingness to take creative risks!

Peer Collaboration 78%

Students helping others overcome similar challenges they’ve documented

Iteration Tracking: Making Progress Visible

Young inventors often struggle to see their progress over time. That’s why I developed our iteration tracking system using oversized poster displays. Each version of a student’s invention gets its own poster panel, creating a visual timeline of improvement that even pre-readers can follow and appreciate.

The Power of Visual Documentation

Version 1.0

First attempts documented

Initial Design

Students sketch their first ideas and list materials. This becomes their baseline for measuring growth.

Version 2.0

Learning from testing

First Revision

After testing, students document what worked and what needed improvement. Photos capture the process!

Version 3.0+

Refining the design

Final Iterations

Multiple refinements lead to the final design. Students can see their journey from concept to creation.

Practical Implementation Strategies

After months of refining our approach, I’ve discovered several strategies that make visual invention journals manageable, even with 22 energetic first graders! The key is creating systems that students can maintain independently while you facilitate deeper learning conversations.

First, I established “Documentation Stations” around our maker space. Each station includes basic supplies and visual reminder cards showing the documentation process. Students know to visit these stations at natural stopping points in their work. This prevents the all-too-common scenario of trying to recreate the entire process after the project is complete!

Documentation Station Icon

Weekly Maker Routines

Monday: Introduce weekly challenge, brainstorm on poster paper
Tuesday: Initial designs and material gathering documentation
Wednesday: First prototype photos and reflection posters
Thursday: Peer feedback sessions using gallery walk format
Friday: Final iterations and celebration gallery

This predictable structure helps students plan their documentation naturally. They know that Thursday’s gallery walk means they need clear visuals by Wednesday’s end, encouraging timely documentation without constant reminders.

Student Success Stories

The transformation in my students’ confidence and creativity has been nothing short of remarkable. Let me share a few stories that showcase the power of visual invention journals.

Emma’s Bridge

Started with popsicle sticks falling apart. Through 5 documented iterations, created a bridge that held 20 toy cars!

Marcus’s Marble Run

His failure wall contributions helped three classmates solve their own marble run challenges.

Sophia’s Robot

Used recycled materials. Her visual journal inspired a whole class recycling invention challenge!

Tips for Getting Started

Ready to transform your maker space with visual invention journals? Here’s my step-by-step guide for getting started, based on what’s worked (and what definitely didn’t!) in my classroom:

Your First Week Action Plan

Day 1-2: Set the Stage
• Print welcome posters explaining the concept
• Create your first demonstration journal together
• Let students decorate journal title posters
• Establish documentation routines

Day 3-4: Practice Together
• Complete a simple class invention
• Document each step as a group
• Create your first “Beautiful Oops” entry
• Celebrate the messy process!

Day 5: Launch Individual Projects
• Start with 15-minute mini-challenges
• Provide plenty of documentation support
• Share journals in a gallery walk
• Celebrate every attempt!

Week 2 and Beyond
• Gradually increase project complexity
• Introduce peer feedback protocols
• Begin iteration tracking
• Display journals prominently

Making It Sustainable

The beauty of using a poster maker machine for school projects like these is the flexibility it provides. I can quickly print templates, celebration certificates, and display materials without breaking our classroom budget.

Budget-Friendly Tips

Managing supplies for 22 young inventors could quickly become expensive, but I’ve found several ways to keep costs minimal:

Laminate base templates for repeated use with dry-erase markers
Use digital photos printed in black and white for documentation
Partner with families for recycled materials and supplies
Create a poster rotation system to maximize wall space
Save exemplar journals digitally for future years

Our printing costs average just pennies per poster when using economical paper options, making this sustainable even on a tight budget.

Discover grants and funding sources to bring visual invention journals to your maker space!

Ready to Transform Your Maker Space?

Visual invention journals have revolutionized how my first graders approach creative challenges. They’ve learned that the journey matters as much as the destination, that failures are simply data for the next attempt, and that sharing their process helps everyone grow. Most importantly, they’ve discovered that they ARE inventors, capable of solving problems and creating amazing things.

Your classroom poster maker isn’t just a tool for printing—it’s a gateway to making thinking visible, celebrating growth, and building a community of confident young innovators. Start small, celebrate often, and watch as your maker space transforms into a living gallery of invention and discovery!

Share This Story, Choose Your Platform!