Hey there, fellow educators! 🌈 Ready to level up your laminating game? I’m beyond excited to share some seriously cool techniques that’ll transform your classroom materials from flat protectors into interactive, textured learning adventures. Whether you’re supporting tactile learners, creating inclusive resources, or just want to add that extra “wow” factor to your teaching materials, these advanced laminating projects using poster machines for textured learning are about to become your new favorite teaching hack!

Why Textured Learning Materials Matter

Let’s talk about why texture is such a game-changer in education. Research shows that multi-sensory learning boosts retention by up to 75% – and that’s where textured materials shine! When students can touch, feel, and interact with learning materials, they’re engaging multiple neural pathways simultaneously. This approach is especially powerful for:

• Students with visual processing differences
• Kinesthetic learners who need hands-on experiences
• Early childhood learners developing fine motor skills
• English Language Learners building vocabulary connections
• Students on the autism spectrum who benefit from sensory input

Close-up shot of hands-on learning materials three different laminated projects: a math manipulative raised dots for counting, a vocabulary board colorful lift-the-flap elements, and a textured

5 Advanced Laminating Projects That’ll Transform Your Teaching

Project 1: Raised Texture Math Manipulatives

Transform flat number lines into tactile learning tools! This technique creates raised bumps that students can feel as they count, perfect for building number sense.

Materials Needed:
• Poster created with your poster machine for schools
Cold laminator
• Clear puff paint or dimensional fabric paint
• Laminating pouches or rolls
• Patience and creativity!

Step-by-Step Process:

1. Design and Print: Create your number line or math grid using bright colors. Pro tip: Use our coated poster paper for vibrant results that won’t smudge!

2. Apply Texture: Before laminating, use puff paint to create raised dots at each number. Let dry completely (usually 4-6 hours).

3. First Lamination: Run through your cold laminator using a standard clear film. This seals in the texture while keeping it touchable.

4. Optional Second Layer: For extra durability, add a second lamination layer, leaving small gaps around textured areas.

Teacher Tip: Create different textures for different number sets – smooth for evens, bumpy for odds!

Project 2: Interactive Lift-the-Flap Vocabulary Boards

Create engaging vocabulary boards where students lift flaps to reveal definitions, translations, or images underneath!

Materials Needed:
• Base poster from your banner printing machine
• Multiple smaller printed pieces
• Laminating film
• Double-sided tape or velcro dots
• Scissors or paper trimmer

Assembly Instructions:

1. Print Your Base: Design a colorful background with spaces marked for vocabulary words. Include visual cues or themed graphics.

2. Create Flaps: Print vocabulary words on separate pieces. Laminate each individually, leaving extra film on one edge for hinging.

3. Prepare Hidden Content: Print definitions, pictures, or translations sized to fit under each flap.

4. Strategic Lamination: Laminate the base poster, then attach flaps using the extra laminate edge as a hinge. Secure with clear tape on the back.

5. Add Interactivity: Use velcro dots for removable flaps, allowing students to match words with definitions!

Differentiation Ideas:
• Color-code by difficulty level
• Add QR codes linking to audio pronunciations
• Include tactile elements like sandpaper letters

75%

Retention Boost
Multi-sensory materials increase learning retention

Why These Techniques Work:

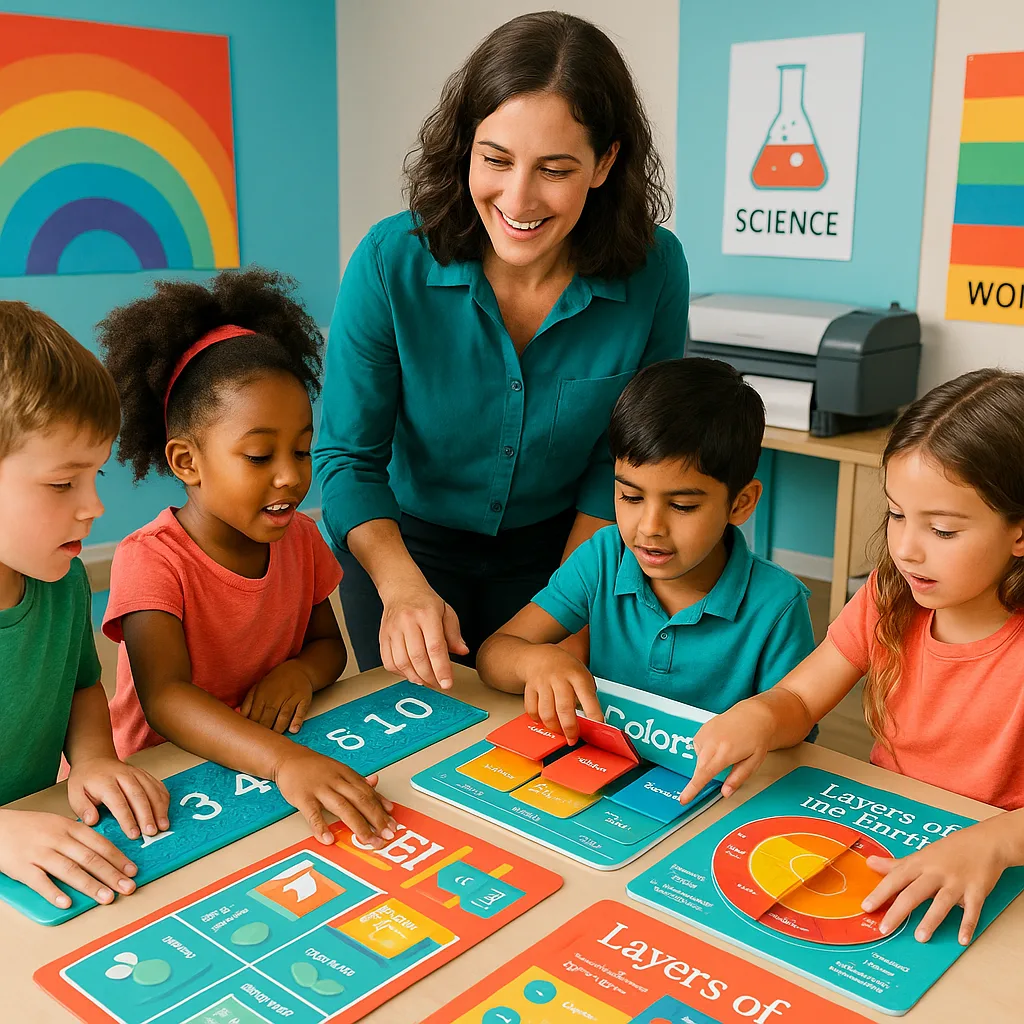
Advanced laminating transforms passive learning materials into active engagement tools. When students physically interact with content – lifting flaps, feeling textures, or manipulating pieces – they’re building stronger neural connections. This hands-on approach particularly benefits students with learning differences, making abstract concepts concrete and memorable.

Plus, these durable materials withstand hundreds of eager hands, making them perfect investments for busy classrooms!

Project 3: Multi-Layer Science Diagrams

Build incredible 3D models using strategic laminating layers – perfect for teaching complex systems like the human body or plant cells!

Materials Needed:
• Multiple printed layers from your poster printer
• Clear and matte laminating films
• Foam adhesive dots or strips
• Precision cutting tools
• Binding rings or brads

Construction Steps:

1. Plan Your Layers: Design each system layer separately (e.g., skeletal, muscular, circulatory). Print on your poster machine for schools for large, detailed visuals.

2. Strategic Printing: Use transparent or semi-transparent areas where layers will overlap. Our white polyester film works beautifully for this!

3. Individual Lamination: Laminate each layer separately, leaving connection points unlaminated.

4. Create Depth: Use foam dots between layers to create actual 3D separation. This helps students visualize how systems interact!

5. Bind Together: Connect layers at the top with rings, allowing students to flip through and explore each system independently or see how they overlap.

Extension Activity: Have students create their own multi-layer diagrams for book reports, showing plot development, character relationships, and themes!

Project 4: Texture Match Sensory Boards

Perfect for special education settings or sensory learning stations, these boards combine visual and tactile elements for powerful learning experiences.

Materials Needed:
• Printed base board with texture labels
• Various textured materials (sandpaper, fabric, bubble wrap, etc.)
• Heavy-duty laminating film
• Strong adhesive
Cold laminator

Creation Process:

1. Design Your Board: Create sections for different textures with corresponding vocabulary (rough, smooth, bumpy, soft).

2. Prepare Textures: Cut textured materials into uniform shapes. Consider using materials that won’t deteriorate under lamination.

3. Strategic Placement: Adhere textures to designated spots before laminating. Leave space around each for the laminate to seal properly.

4. Heavy-Duty Lamination: Use thicker laminating film (10 mil or higher) to accommodate texture variations while maintaining durability.

5. Create Matching Cards: Print and laminate separate cards with texture names for matching activities.

Accessibility Note: These boards are fantastic for students with visual impairments, providing tactile ways to explore descriptive vocabulary!

Project 5: Interactive Timeline Scroll

Create an engaging, touchable timeline that students can physically interact with using your banner printing machine!

Materials Needed:
• Long banner print (36″ or 44″ width works great!)
• Laminating film
• Velcro strips
• Printed event cards
• Ribbon or yarn
• Small objects or printed images

Assembly Guide:

1. Print the Base: Design a visually appealing timeline with clear date markers. Use your banner printing machine for continuous length – perfect for covering entire historical periods!

2. Laminate in Sections: For extra-long timelines, laminate in overlapping sections, creating a seamless, durable surface.

3. Add Interactive Elements:
– Attach velcro strips at key dates
– Create removable event cards students can place
– Add texture to represent different eras (smooth for modern, rough for ancient)

4. Incorporate 3D Elements: Laminate pockets into the timeline where students can insert artifacts, images, or written responses.

5. Create Extensions: Design supplementary materials like “zoom-in” cards that provide detailed information about specific events.

Cross-Curricular Connection: Use this technique for literature timelines, scientific discoveries, or even personal student growth portfolios!

Poster Machines for Textured Learning: Pro Tips & Troubleshooting

Temperature Matters:
Cold laminating is your best friend for textured materials! Heat can melt adhesives, flatten textures, or cause bubbling. Our 25″ Cold Laminator is perfect for these projects.

Paper Selection is Key:
Choose heavier papers when creating textured materials. Our heavyweight coated paper provides the perfect base for dimensional projects.

Plan for Thickness:
Remember that textured materials need more clearance. Leave extra space when trimming, and consider using pouches instead of rolls for very dimensional pieces.

Durability Testing:
Before creating 30 copies, make one prototype and test it with actual students. Check for:
• Edge peeling
• Texture adherence
• Overall durability
• Student engagement level

Storage Solutions:
Textured materials need special care. Store flat when possible, use protective sleeves, and create a check-out system for high-demand items.

Budget-Friendly Tip:
Partner with other teachers to share material costs and laminating time. Our printing cost calculator helps you budget effectively!

Making It Work in Your Classroom

These advanced laminating techniques might seem time-intensive at first, but the payoff is huge! Students engage more deeply, retain information better, and genuinely enjoy interacting with these materials. Plus, with proper lamination, these resources last for years, making them smart investments in your teaching toolkit.

Start small – pick one project that aligns with your current curriculum needs. Maybe it’s textured number lines for your math center or interactive vocabulary boards for your ELL students. Once you see the engagement and learning gains, you’ll be hooked on creating more!

Remember, every student learns differently, and these multi-sensory materials ensure nobody gets left behind. Whether you’re using a poster machine for schools or a banner printing machine, the key is creativity and understanding your students’ needs.

Ready to Transform Your Teaching?

Join thousands of educators who are already creating amazing textured learning materials with School Poster Makers! Our comprehensive comparison guide helps you choose the perfect poster machine for your classroom needs. Plus, with our 2-year warranty and unlimited support, you’re never alone in your creative journey!

Questions about funding? Check out our funding sources guide to make these tools accessible for your school. Let’s create learning materials that every student can touch, feel, and connect with! 🎨✨

Share This Story, Choose Your Platform!