School Poster Printer for Reading Games
Why Durable Reading Games Matter in First Grade
After watching countless paper-based activities fall apart in tiny hands, I realized that durability isn’t just about saving money—it’s about maintaining learning momentum. When materials stay intact, students can focus on reading skills rather than handling fragile pieces. Plus, there’s something magical about pulling out a perfectly preserved game from September in May!
Creating laminated materials with a Campus Pro 36 Poster Maker Advanced Package has revolutionized how I approach literacy centers. The vibrant colors stay bright, the edges don’t curl, and spilled juice boxes become minor inconveniences rather than material disasters.
Creating Word Sort Activities That Last
Word sorts are the backbone of my phonics instruction, but they used to be my biggest headache. Tiny word cards would disappear faster than cookies at a class party! Now, I design oversized word sort mats using our poster machine for schools, print them on durable paper, and laminate everything for year-round use.
Here’s my process for creating indestructible word sorts:

Materials Needed:
• Poster paper (24″ x 36″ works perfectly)
• Cold Laminator for finishing
• Velcro dots for reusable word cards
• Bright, engaging fonts (I love Comic Sans for readability!)
Student mastery rates with laminated materials
School Poster Printer Literacy Games: Phonics Activities
Phonics games are where the magic really happens in first grade! Using our school poster printer, I’ve created an entire library of reusable phonics activities that my students beg to use during centers. The key is making them visually appealing AND educationally sound.
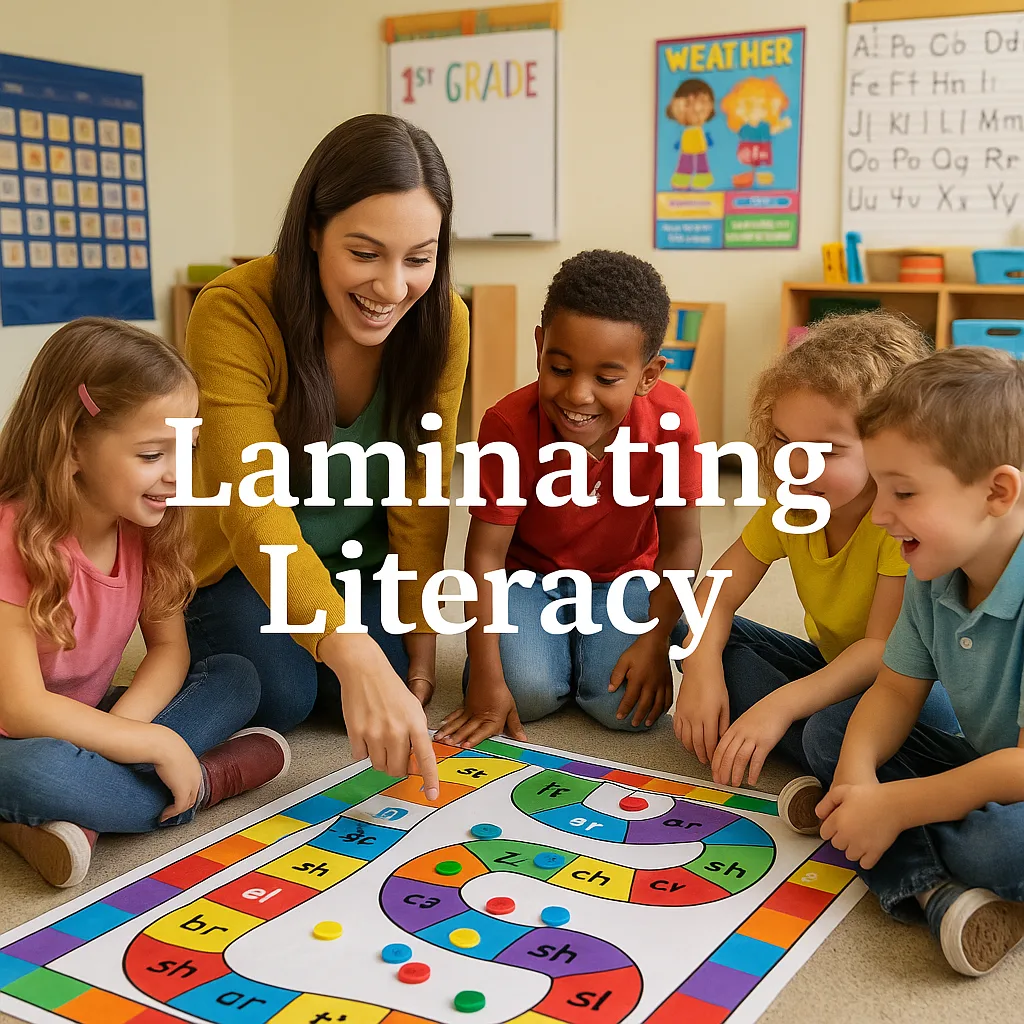
My favorite creation is our “Phonics Path” game board. I designed a winding path with different phonics challenges at each space, printed it poster-size, and laminated it for floor use. Students roll dice, move game pieces, and complete phonics tasks as they go. It’s been three months of daily use, and it still looks brand new!
Creating Your Own Phonics Games
Here’s my step-by-step process for designing phonics games that withstand enthusiastic first-graders:
1. Design with Purpose: Start with your learning objective. Are you targeting CVC words? Digraphs? Long vowels? Let the skill drive the design.
2. Choose Vibrant Colors: I use the Amplify Poster Maker because the colors stay vivid even after lamination. Bright visuals keep students engaged!
3. Size Matters: Print game boards at least 24″ x 36″ so multiple students can play together comfortably.
4. Laminate Everything: This is non-negotiable! Even the sturdiest poster paper needs protection from six-year-old hands.
5. Add Interactive Elements: Velcro strips, clear pockets for cards, and dry-erase surfaces multiply the learning possibilities.
Budget-Friendly Tips for Maximum Impact
I know teacher budgets are tight (mine certainly is!), so I’ve learned to maximize every poster and laminating sheet. Using a poster machine for schools has actually saved me money in the long run. Instead of buying pre-made materials that don’t quite fit my students’ needs, I create exactly what we need, when we need it.
One poster-sized game board can be cut into multiple smaller activities. I often design four different games on one 24″ x 36″ sheet, then cut and laminate them separately. It’s like getting four games for the price of one! The printing costs breakdown shows just how affordable this approach can be.
Money-Saving Strategies:
✓ Batch Printing: Design multiple games with similar themes and print them together
✓ Reversible Games: Print different activities on each side before laminating
✓ Modular Designs: Create base boards that work with interchangeable card sets
✓ Share and Trade: Partner with grade-level teammates to split design work
✓ Digital Archives: Save all designs for reprinting or sharing next year
Making It All Work Together
After three months of creating laminated literacy materials, I can’t imagine teaching without them. My reading centers run smoothly, students handle materials independently, and I spend zero time replacing torn or crumpled resources. The initial time investment in designing and laminating pays off every single day.
The best part? Watching my first graders confidently manipulate sentence strips, sort word families, and play phonics games without worrying about being “too rough” with the materials. They’re learning to read while developing fine motor skills and collaborative abilities—all thanks to durable, thoughtfully designed resources.
If you’re ready to revolutionize your reading instruction, start small. Choose one activity that you constantly replace, design it beautifully, print it large, and laminate it well. Once you see the difference it makes, you’ll be hooked! Trust me, your future self (and your students) will thank you.
Remember, creating lasting literacy materials isn’t just about saving money or reducing prep time—it’s about providing consistent, high-quality learning experiences that help every student succeed. With the right tools and a little creativity, you can build a literacy center that truly stands the test of time (and enthusiastic first-graders!).