Help guides/Campus Pro 24 and 44 assembly

Campus Pro 24 and 44,


Campus pro assembly

Assembling a Campus Pro 24 or 44 takes about 110 minutes and two or three people. Build the stand, mount the printer, remove the packing materials, then install ink, printheads and paper and let the printer align itself.

At a glance

Applies toCampus Pro 24 (24-inch) and Campus Pro 44 (44-inch, uses 42-inch media)
TimeAbout 110 minutes
PeopleAt least 2; a third helps when turning the printer
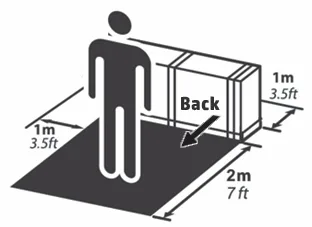
SpaceAt least 3 × 3 m (118 × 118 in) of clear floor
You needRoll paper at least 15 in (381 mm) wide for alignment; a LAN cable if you connect to the network (neither included)
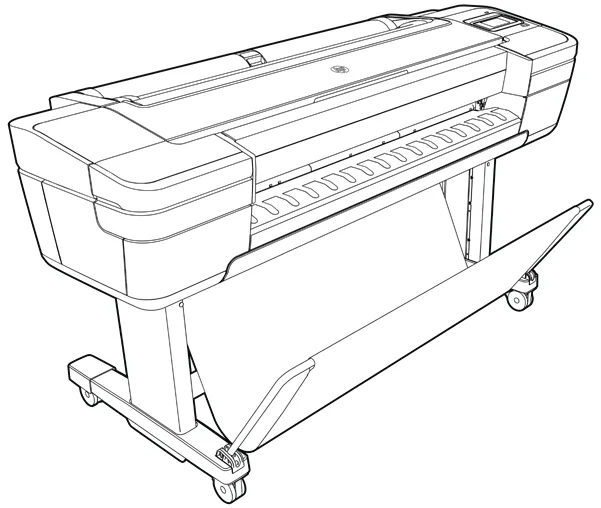
Campus Pro 24 and 44 assembly: overview, photo 1
The finished Campus Pro poster maker on its stand with the collection basket, about 110 minutes from unboxing.
Campus Pro 24 and 44 assembly: overview, photo 2
Clear an area of roughly 3 by 3 meters around the crate so two or three people can work safely.

Before you begin

  • The product is heavy; have at least two people. For some steps, a third person helps.
  • Printhead alignment requires media at least 15 in (381 mm) wide; roll paper is recommended.
  • You’ll need a nearby LAN (network) connection if connecting to the internet. (Roll paper and LAN cables are not included.)

1) Assemble the stand
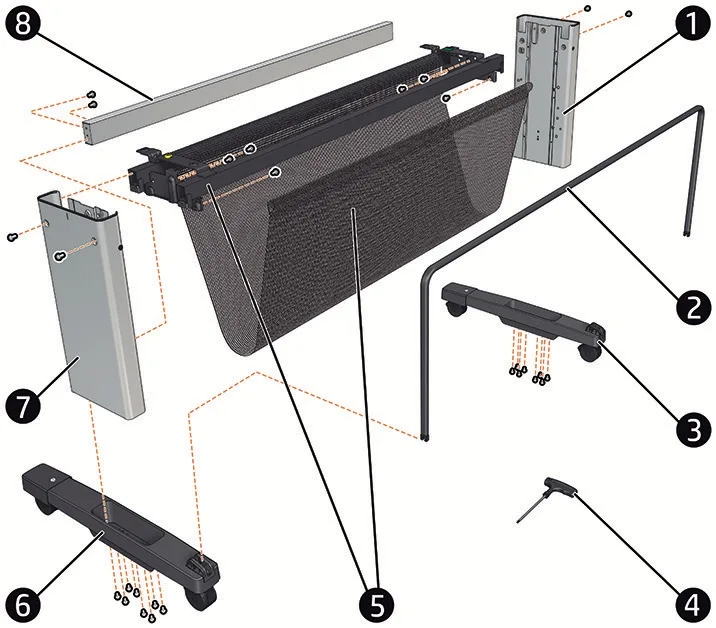
Campus Pro 24 and 44 assembly: 1) Assemble the stand, photo 3
Lay out the stand parts first: legs, feet, cross brace, basket frame, screwdriver and screws.
Campus Pro 24 and 44 assembly: 1) Assemble the stand, photo 4
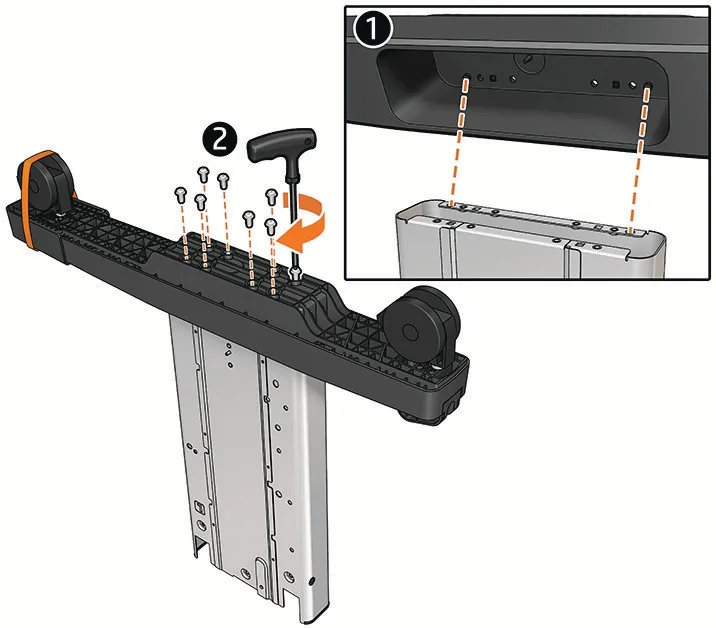
Step 1.2: fasten each foot to its leg with eight screws, leaving the orange wheel tape in place.
Campus Pro 24 and 44 assembly: 1) Assemble the stand, photo 5
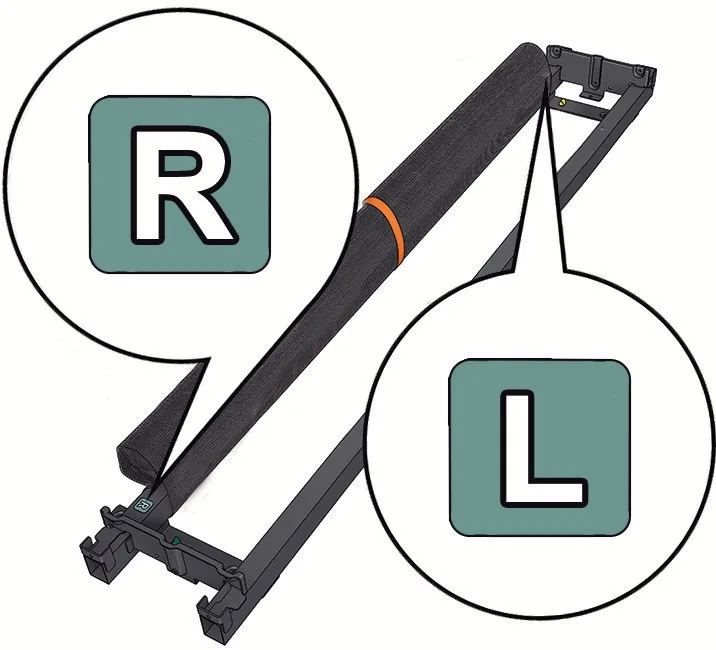
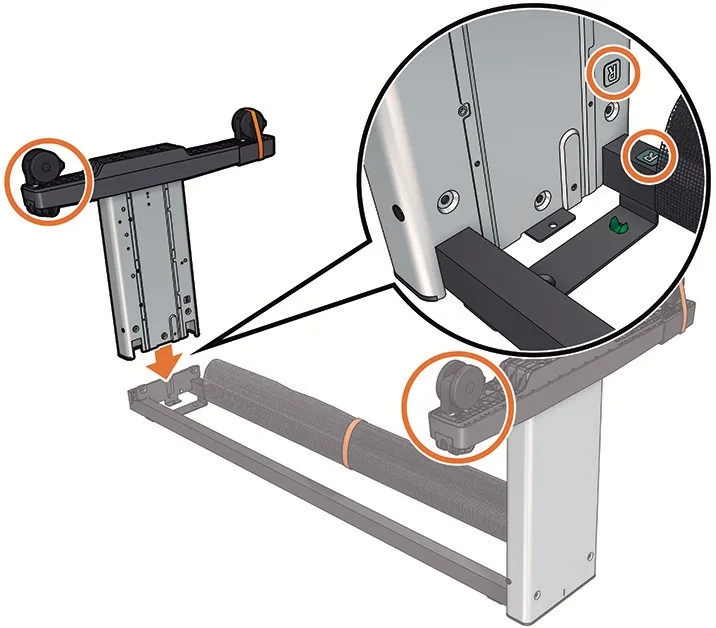
Step 1.3: set the cross brace on the floor with the R and L labels facing up.

1.1 Locate the stand parts: right leg, left leg, right foot, left foot, cross brace, basket frame, cross bar (Campus Pro 44 only), plus screwdriver and screws.

1.2 Attach one foot to a leg with 8 screws. Repeat for the other foot/leg. Important: Don’t remove the orange transport tape from the wheels yet.

1.3 Place the cross brace on the floor with L and R facing up.
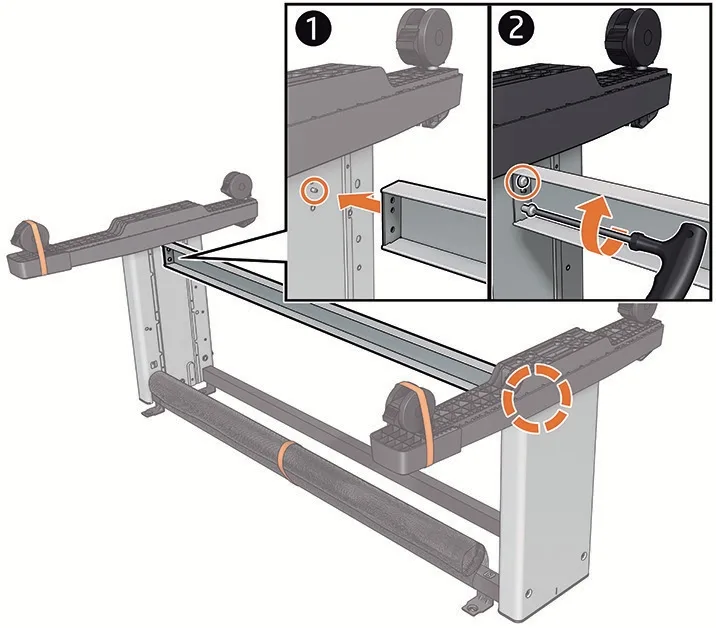
Campus Pro 24 and 44 assembly: 1) Assemble the stand, photo 6
Step 1.4: slide the first leg onto the cross brace, matching right to right, and lightly fasten three screws.
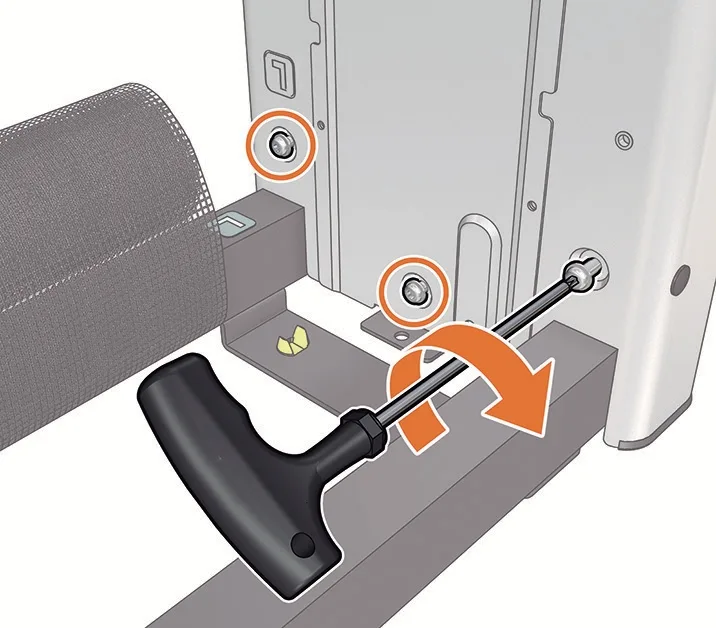
Campus Pro 24 and 44 assembly: 1) Assemble the stand, photo 7
Lightly turn the inner screws with the T-handle screwdriver, but do not fully tighten them yet.
Campus Pro 24 and 44 assembly: 1) Assemble the stand, photo 8
Step 1.5: add the second leg so the basket supports on both feet face the same side.

1.4 Slide the first leg onto the cross brace, matching R→R and L→L. Lightly fasten 3 inner screws. Don’t fully tighten.

1.5 Slide the second leg on; ensure the basket supports on both feet are on the same side. Lightly fasten 3 inner screws.
Campus Pro 24 and 44 assembly: 1) Assemble the stand, photo 9
On the Campus Pro 44 only, fix the lower cross bar between the legs with two screws per side.
Campus Pro 44 Only: Fix the lower cross bar between the legs with 4 screws (2 per side).
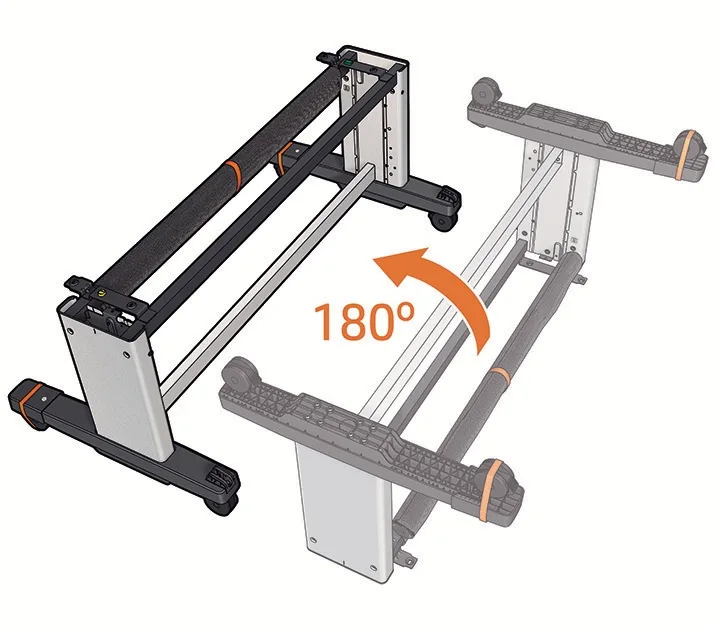
Campus Pro 24 and 44 assembly: 1) Assemble the stand, photo 10
Step 1.6: turn the partly assembled poster maker stand upright onto its wheels.
Campus Pro 24 and 44 assembly: 1) Assemble the stand, photo 11
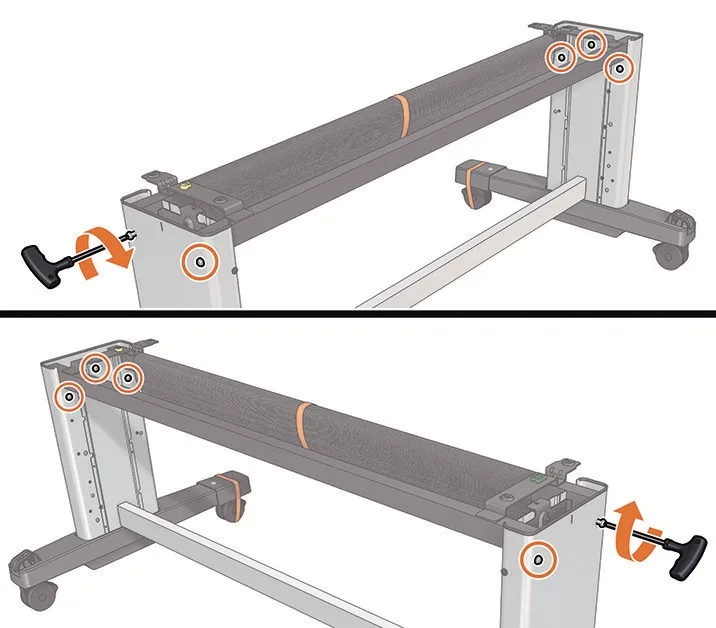
Step 1.7: attach the outside of each leg to the cross brace with two screws, then tighten everything.
Campus Pro 24 and 44 assembly: 1) Assemble the stand, photo 12
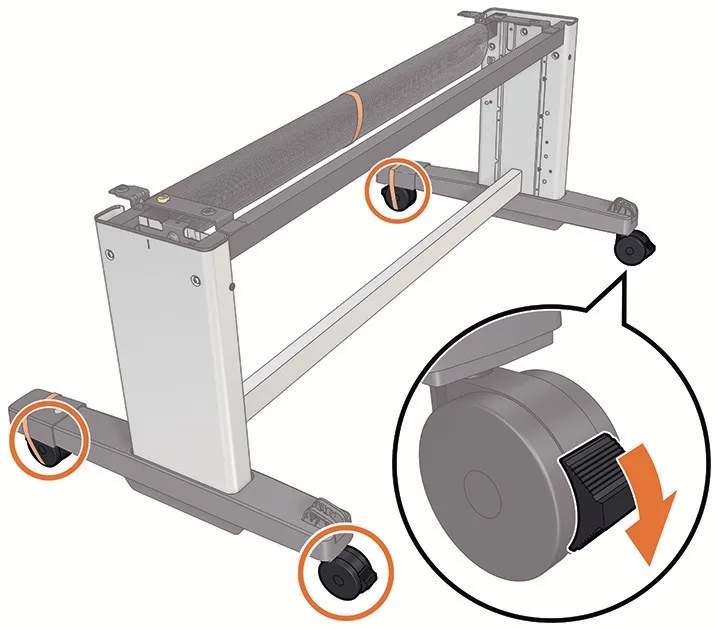
Step 1.9: lock all four wheels so the stand stays put while the printer is mounted.

1.6 Turn the stand upright.

1.7 Attach the outside of each leg to the cross brace with 2 screws per leg.

1.8 Now fully tighten all stand screws. You should have two spare screws remaining.

1.9 Lock all four wheels.

2) Attach the printer body to the stand
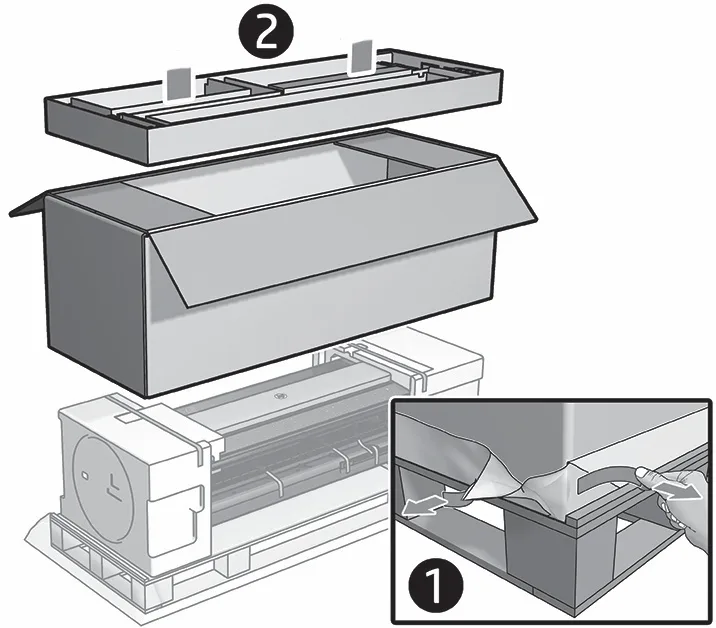
Campus Pro 24 and 44 assembly: 2) Attach the printer body to the stand, photo 13
Step 2.1: lift out the shipping trays and boxes packed on top of the printer body.
Campus Pro 24 and 44 assembly: 2) Attach the printer body to the stand, photo 14
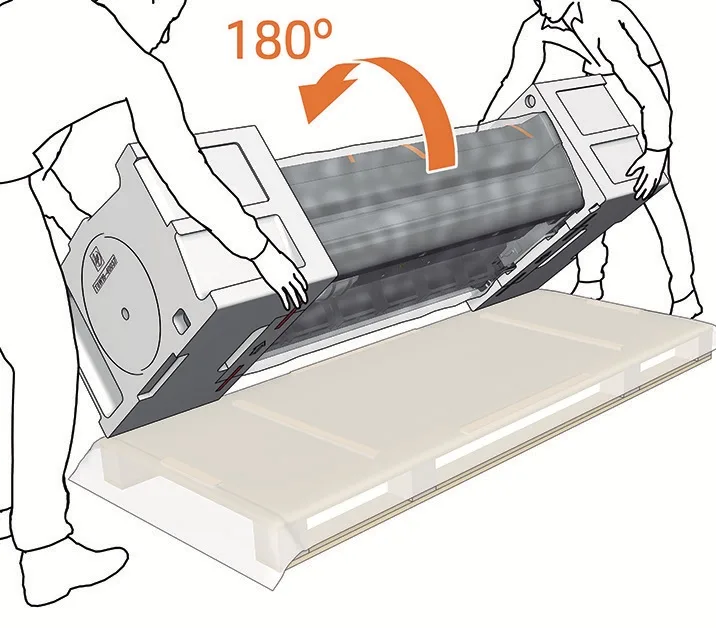
With two or three people, rotate the printer body 180 degrees so its underside faces up.
Campus Pro 24 and 44 assembly: 2) Attach the printer body to the stand, photo 15
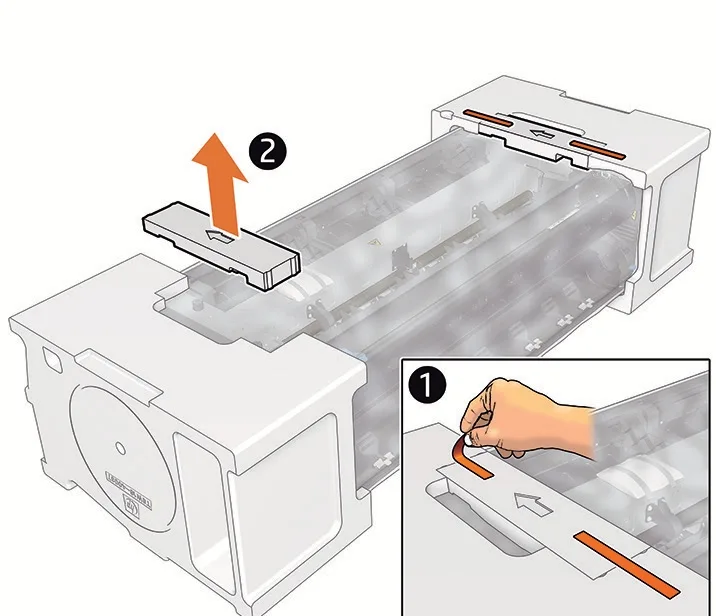
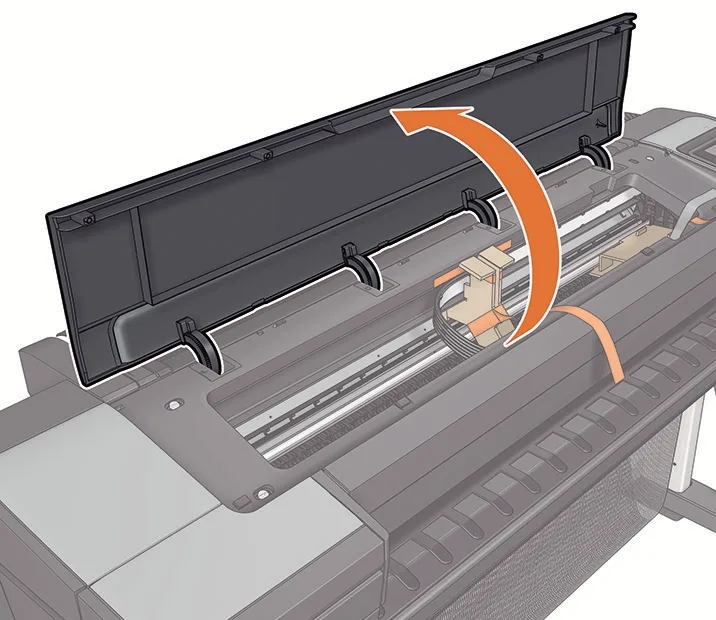
Steps 2.2 and 2.3: open the clear cover, remove desiccant bags and pull the small flaps from the foam ends.

2.1 Remove shipping tape, trays, and boxes as indicated on packaging.

Important: Confirm there’s nothing on top of the printer body. With 2–3 people, rotate the unit 180° so the bottom faces upward.

2.2 Remove the tape from the clear protective cover and open it; remove any desiccant bag(s).

2.3 Remove the small flaps from each foam end piece. Do not remove the large foam ends yet.
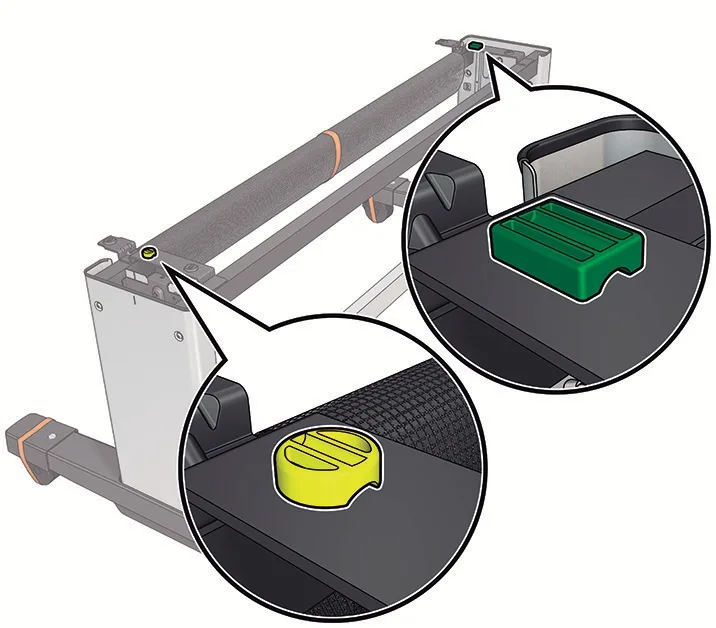
Campus Pro 24 and 44 assembly: 2) Attach the printer body to the stand, photo 16
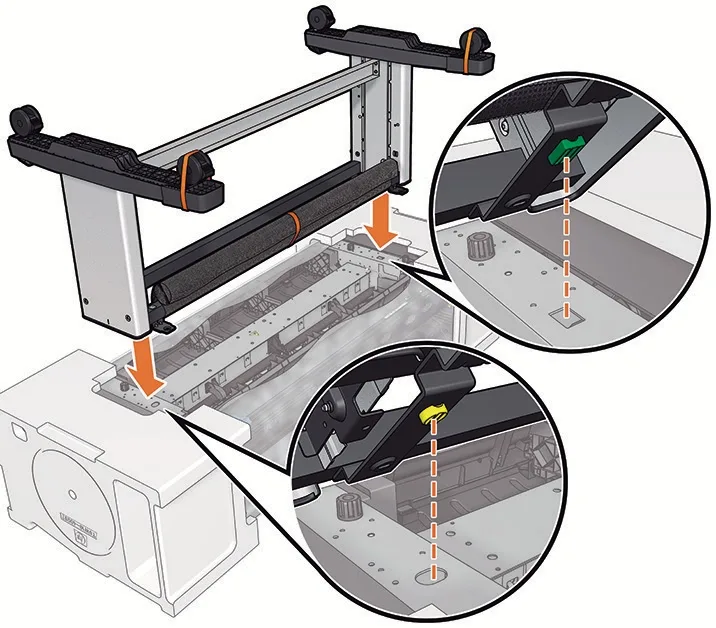
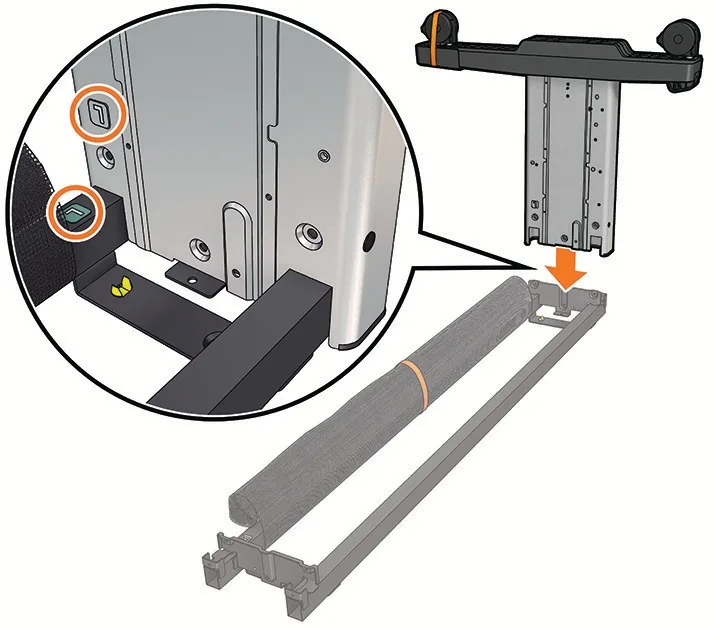
Step 2.4: find the round yellow pin and the square green pin that guide the stand into place.
Campus Pro 24 and 44 assembly: 2) Attach the printer body to the stand, photo 17
Step 2.5: lower the stand onto the printer so each colored pin seats in its matching hole.
Campus Pro 24 and 44 assembly: 2) Attach the printer body to the stand, photo 18
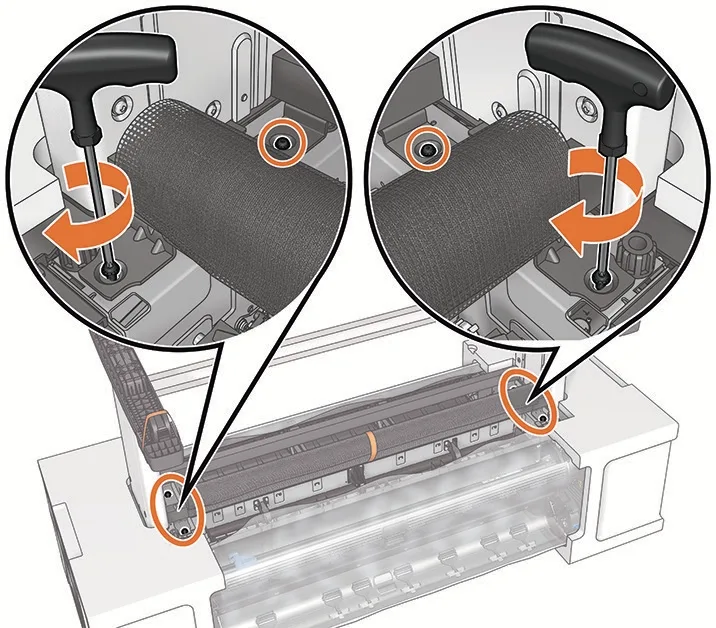
Step 2.6: with the wheels locked, secure the printer to the stand from below with four black screws.

2.4 Identify the round yellow pin on one leg and the square green pin on the other — these align with holes in the printer underside.

2.5 Lower the stand onto the underside so colored pins seat in the matching holes.

2.6 Confirm wheels are locked, then secure the printer to the stand from below with 4 black screws.
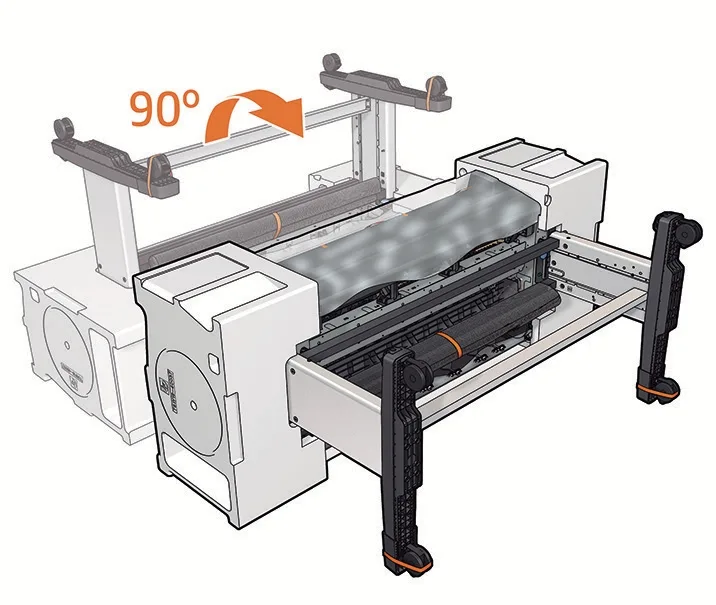
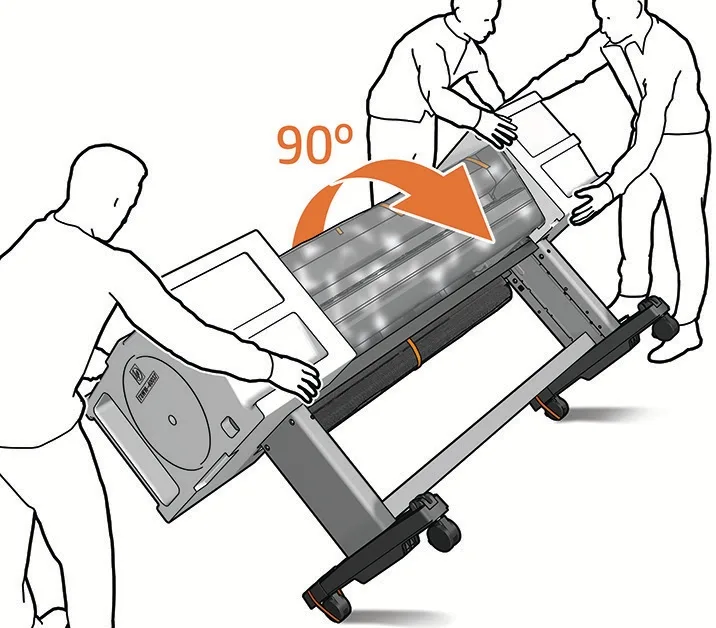
Campus Pro 24 and 44 assembly: 2) Attach the printer body to the stand, photo 19
Step 2.7: rotate the unit 90 degrees to reach the front, keeping the roll feeds facing down.
Campus Pro 24 and 44 assembly: 2) Attach the printer body to the stand, photo 20
Step 2.8: holding the foam ends, two people tip the poster maker upright onto all four wheels.

2.7 Rotate the unit 90° to access the front.

  • Keep roll feeds facing downward while rotating.

2.8 Holding the unit by the foam ends, rotate it upright so all four wheels touch the floor.

  • Approx. shipping weights: 24-inch ≈ 70 kg (154 lb); 44-inch ≈ 90 kg (198 lb).
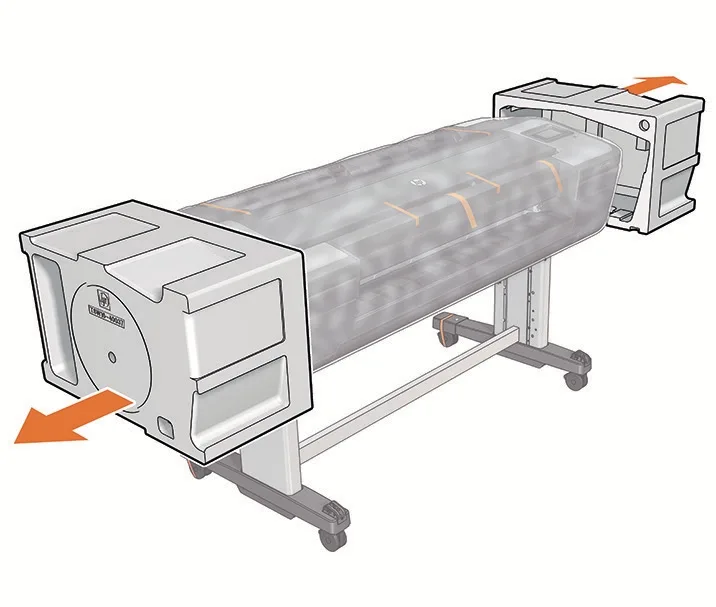
Campus Pro 24 and 44 assembly: 2) Attach the printer body to the stand, photo 21
Slide off the foam end pieces once the printer is standing on its wheels.
Campus Pro 24 and 44 assembly: 2) Attach the printer body to the stand, photo 22
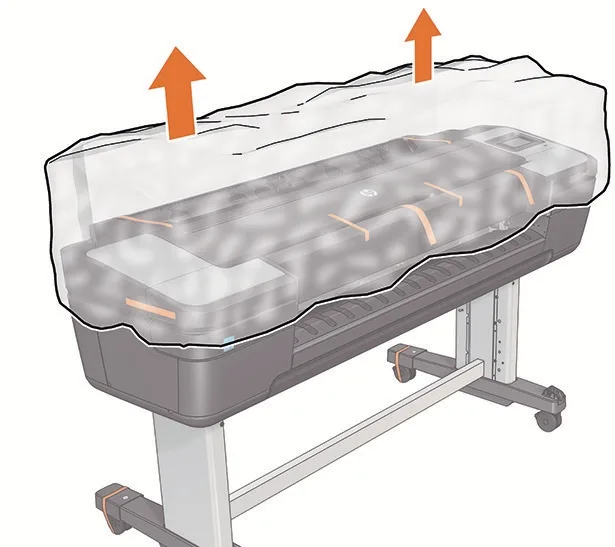
Lift away the clear protective cover to uncover the printer body.
Remove the foam end pieces and the clear protective cover.
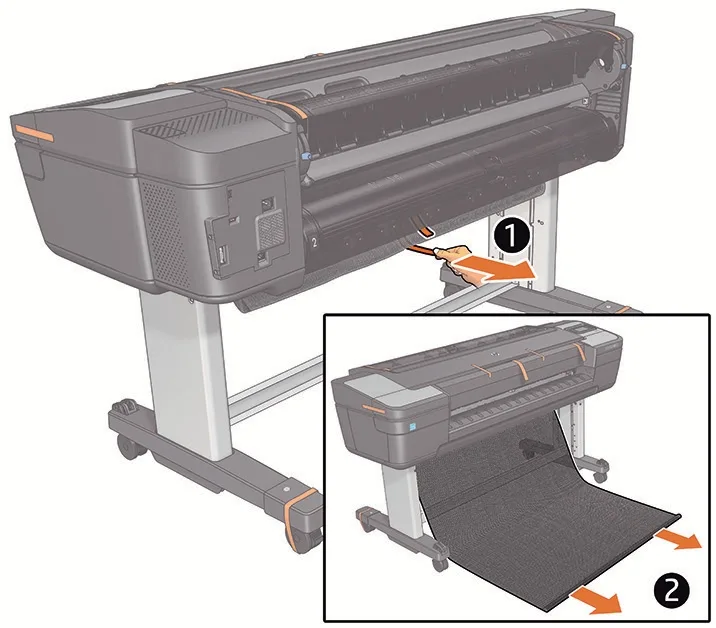
Campus Pro 24 and 44 assembly: 2) Attach the printer body to the stand, photo 23
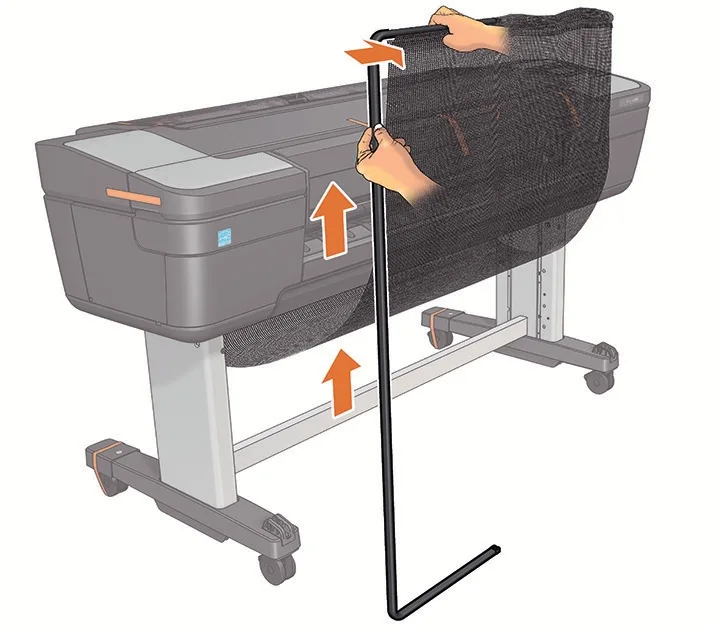
Step 2.9: pass the basket fabric forward under the printer before inserting the frame.
Campus Pro 24 and 44 assembly: 2) Attach the printer body to the stand, photo 24
Insert the basket frame through the fabric sleeve and unfold the fabric fully.
Campus Pro 24 and 44 assembly: 2) Attach the printer body to the stand, photo 25
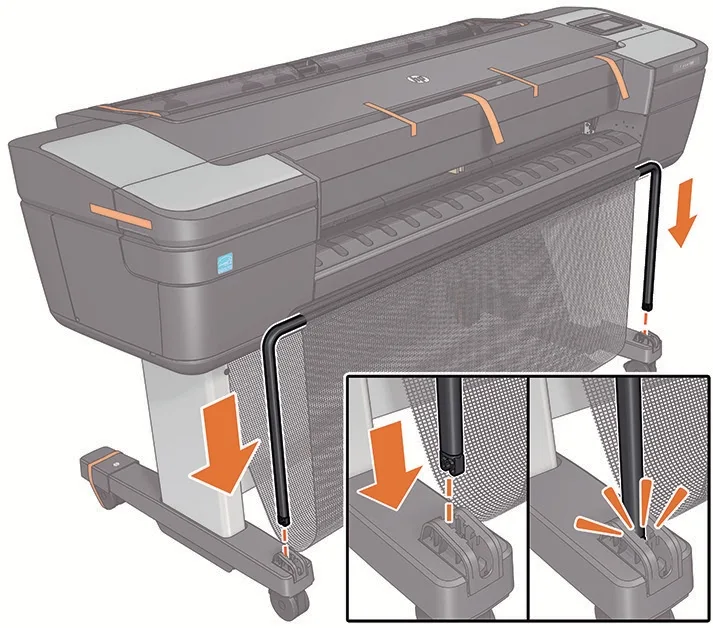
Clip the basket frame into the stand feet until each side clicks into place.

2.9 Basket: Pass the fabric forward under the printer, insert the frame, then clip the frame into the feet until it clicks. Unfold the fabric fully.
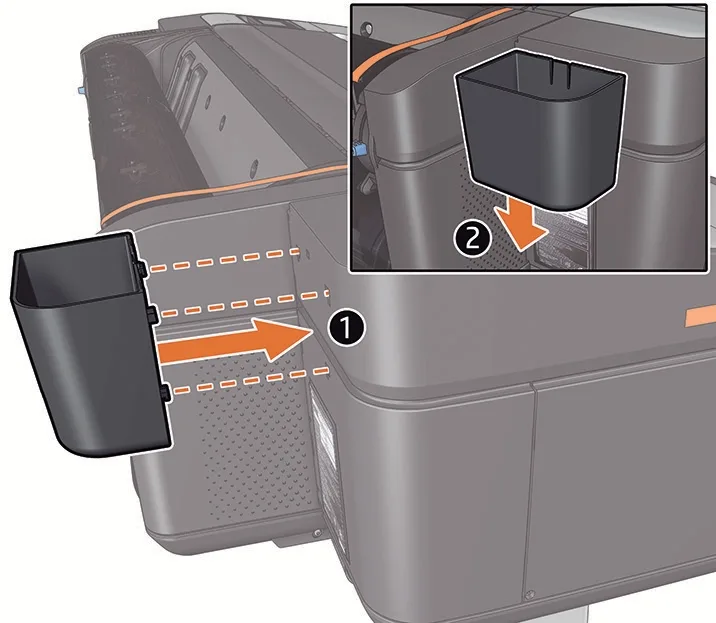
Campus Pro 24 and 44 assembly: 2) Attach the printer body to the stand, photo 26
Install the accessory pocket on the back of the printer to keep small tools and guides handy.
Install the accessory pocket on the rear of the printer.

3) Prepare the printer
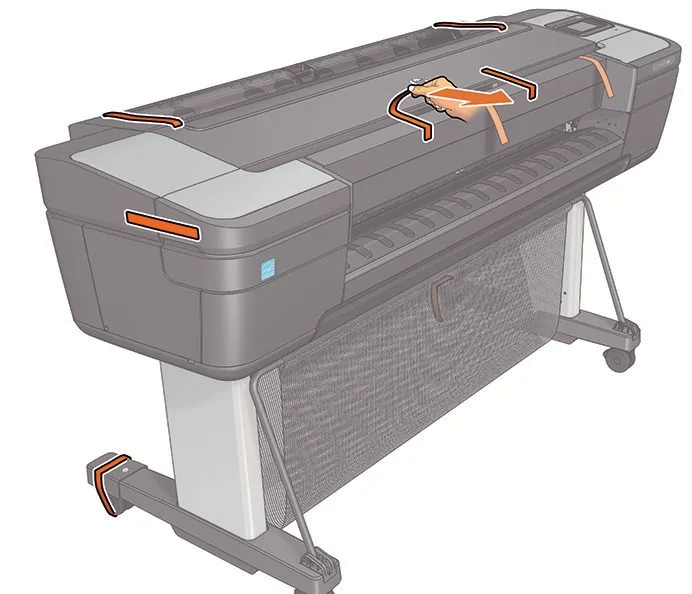
Campus Pro 24 and 44 assembly: 3) Prepare the printer, photo 27
Step 3.1: peel off all orange transport tape on the outside of the printer.
Campus Pro 24 and 44 assembly: 3) Prepare the printer, photo 28
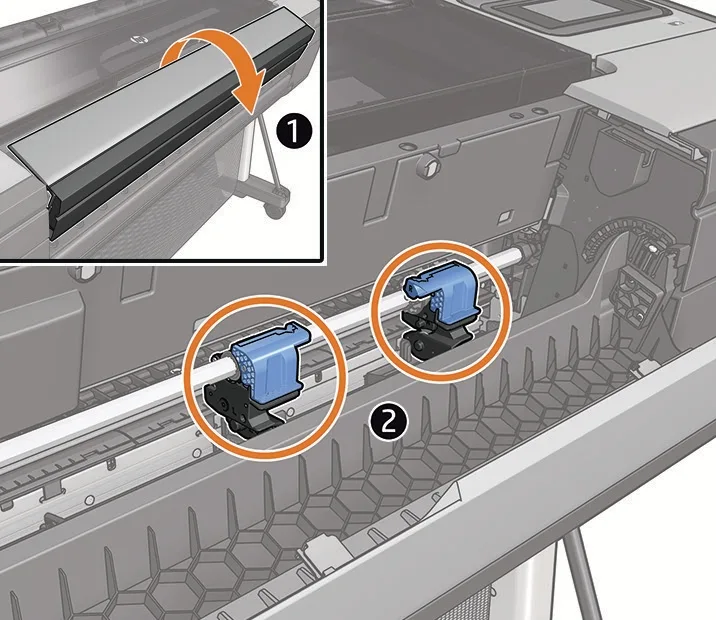
Step 3.2: on models with vertical trimmers, open the cover and check the trimmers sit on the bar.
Campus Pro 24 and 44 assembly: 3) Prepare the printer, photo 29
Step 3.3: open the front window to reach the inside of the poster maker.

3.1 Remove all orange transport tape on the outside. (Leave any orange tape inside the printer until prompted.)

3.2 Models with vertical trimmers: Open the vertical-trimmer cover and confirm trimmers are seated on the bar.

3.3 Open the front window.
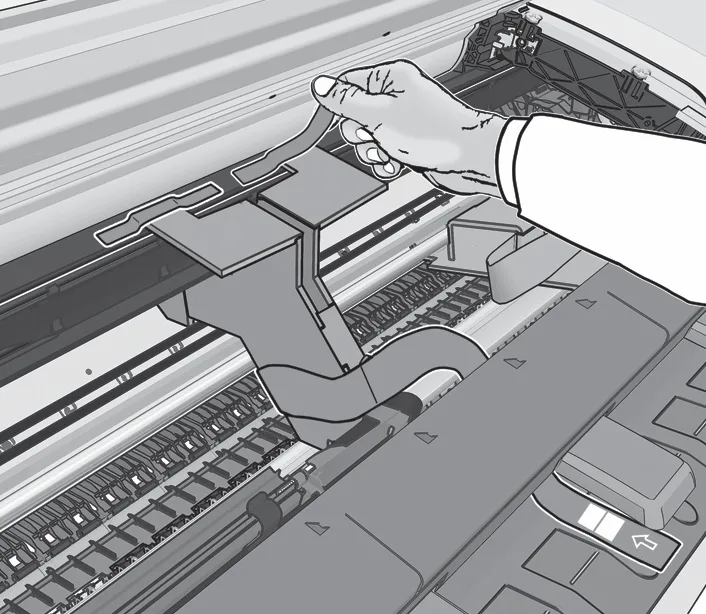
Campus Pro 24 and 44 assembly: 3) Prepare the printer, photo 30
Step 3.4: remove the tape holding the cardboard support inside the printer.
Campus Pro 24 and 44 assembly: 3) Prepare the printer, photo 31
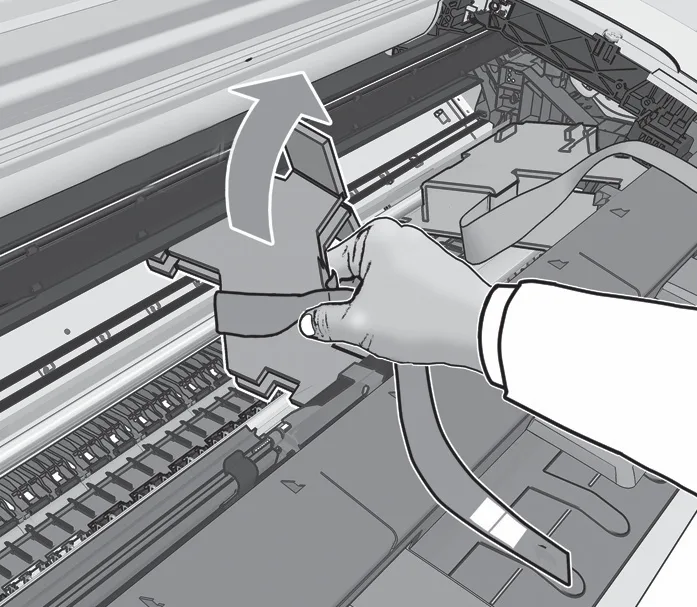
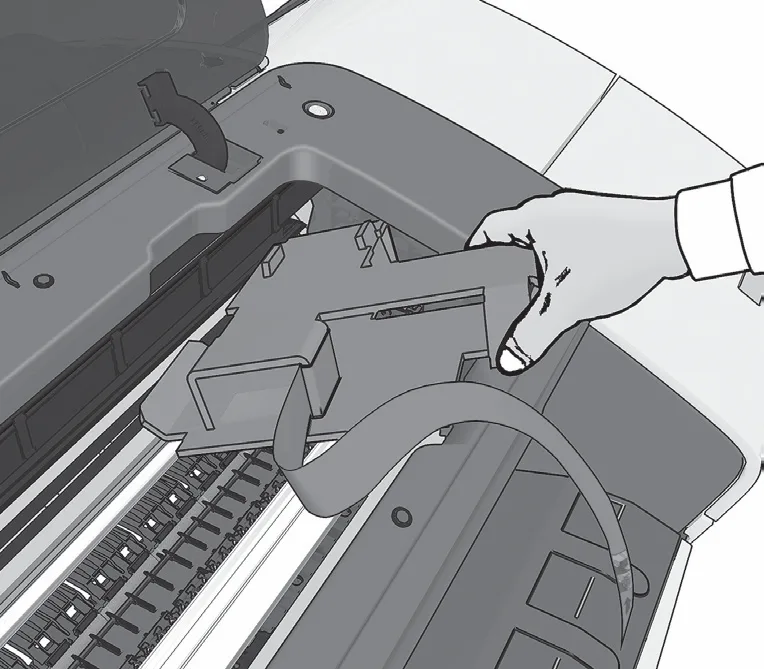
Step 3.5: rotate the internal cardboard support 90 degrees to the right, keeping clear of the belts.
Campus Pro 24 and 44 assembly: 3) Prepare the printer, photo 32
Lift the cardboard support straight up and out, and repeat if a second support is inside.

3.4 You will see a cardboard support attached to the product with tape. Remove the tape.

3.5 Remove any internal cardboard support(s):

  • Rotate the indicated support 90° to the right (avoid belts).
  • Lift the support straight up and out. If you see another, repeat.
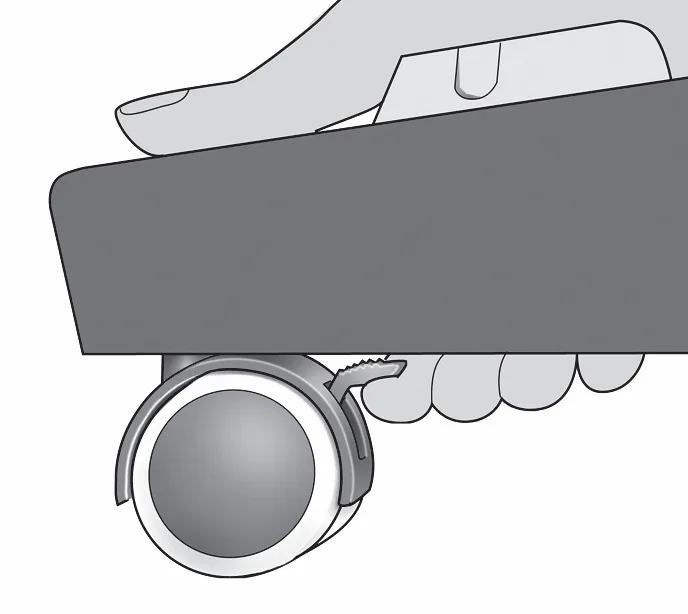
Campus Pro 24 and 44 assembly: 3) Prepare the printer, photo 33
Unlock the wheels to roll the printer to its final spot, then lock them again.
Unlock wheels, move the printer to its final location, and lock wheels again.
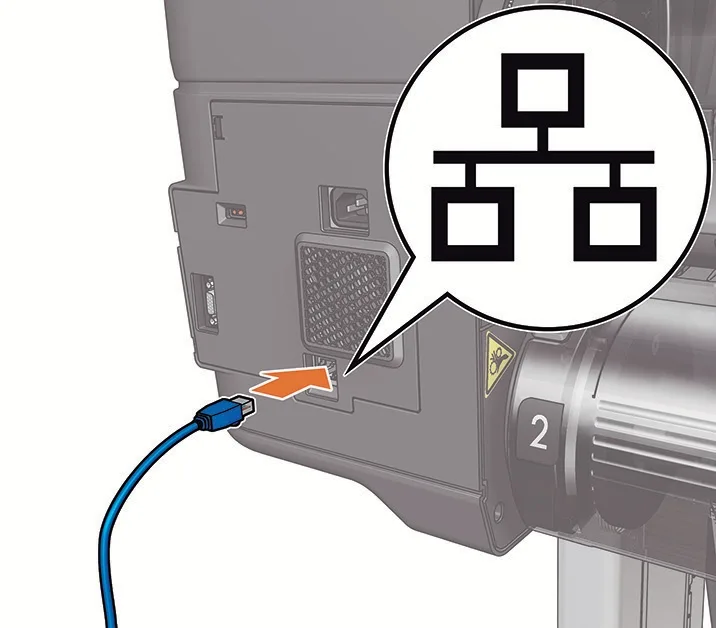
Campus Pro 24 and 44 assembly: 3) Prepare the printer, photo 34
Step 3.6: connect a network cable to the LAN port if the poster maker will print over the school network.
Campus Pro 24 and 44 assembly: 3) Prepare the printer, photo 35
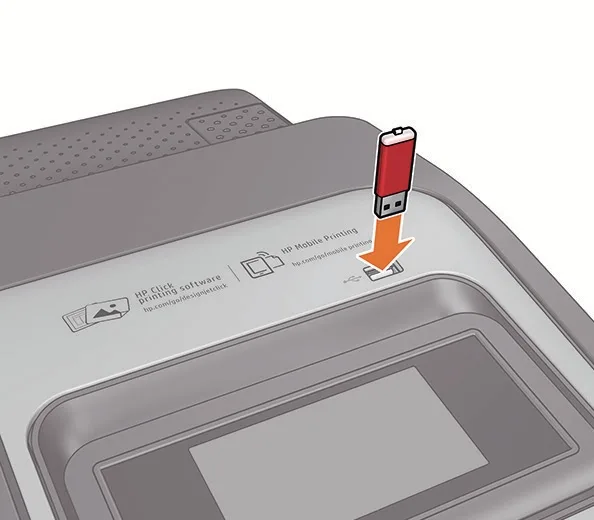
If the box includes a firmware USB drive, insert it and follow the included instructions.
Campus Pro 24 and 44 assembly: 3) Prepare the printer, photo 36
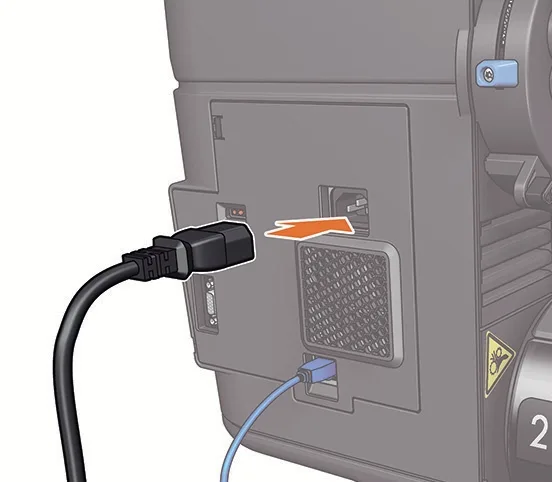
Step 3.7: plug the power cable into the printer and a grounded outlet, then switch it on.

3.6 Connect the network (LAN) cable if applicable.

If your box includes a USB flash drive labeled for firmware, follow the included instructions. Otherwise, skip.

3.7 Connect the power cable to the printer and a grounded outlet; switch on.
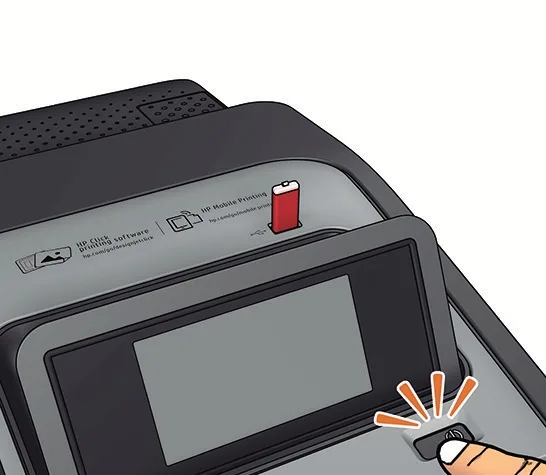
Campus Pro 24 and 44 assembly: 3) Prepare the printer, photo 37
Step 3.8: peel the protective film from the front-panel display and viewing window.
Campus Pro 24 and 44 assembly: 3) Prepare the printer, photo 38
Step 3.9: choose a language on the front panel when the startup screen asks.

3.8 Remove the protective film from the viewing window and the front-panel display.

3.9 On the front panel, the startup logo appears. Select your language when prompted. If a USB drive is detected, follow the on-panel instructions.

4) Install supplies

4.1 Install Ink Cartridges (x6)
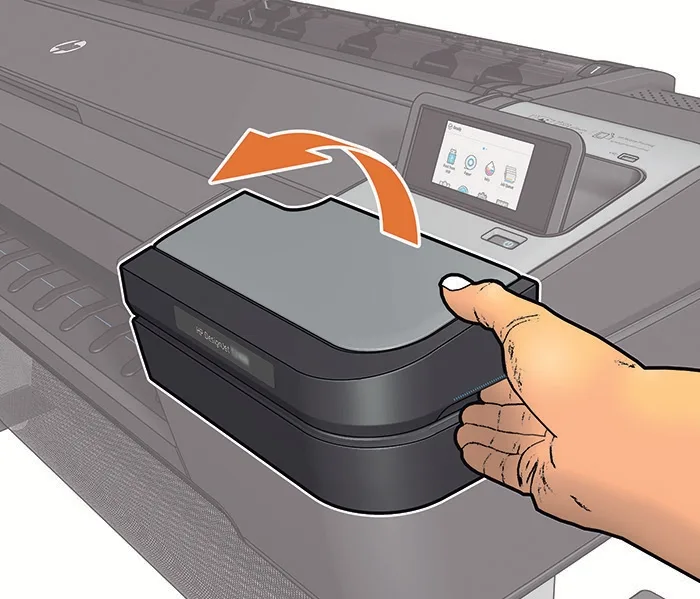
Campus Pro 24 and 44 assembly: 4.1 Install Ink Cartridges (x6), photo 39
Step 4.1a: open the right-side ink cartridge door when the front panel prompts you.
Campus Pro 24 and 44 assembly: 4.1 Install Ink Cartridges (x6), photo 40
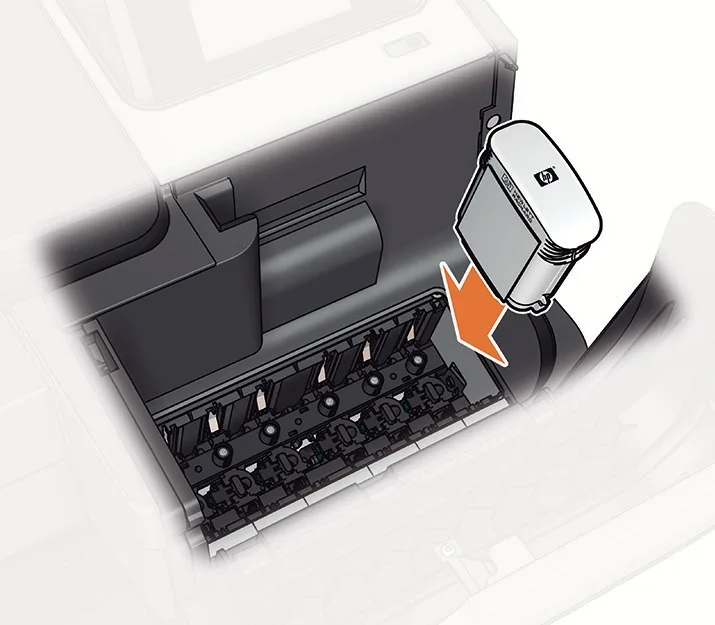
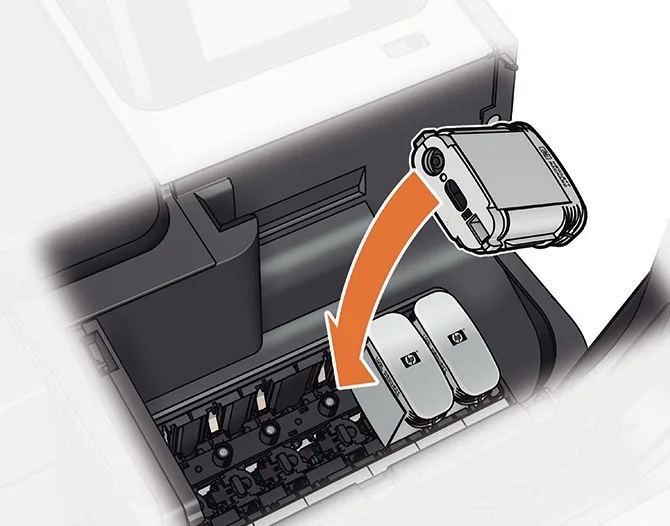
Step 4.1b: slide each of the six ink cartridges into the slot with the matching color label.
Campus Pro 24 and 44 assembly: 4.1 Install Ink Cartridges (x6), photo 41
Push every cartridge fully home until the front panel confirms it has been detected.

4.1a Wait for the front panel prompt. When the front panel asks you to insert ink, open the right-side ink-cartridge door.

4.1b Insert cartridges one by one.

  • Insert all six cartridges, matching each color label to the same-color slot.
  • Do not touch any pins, leads, or circuits on the cartridges.
  • Push each cartridge fully home; the front panel will confirm detection.

4.1c Let the printer prepare the ink system. After the last cartridge is seated, the printer prepares the ink system. Follow any on-screen prompts.

4.2 Install Printheads
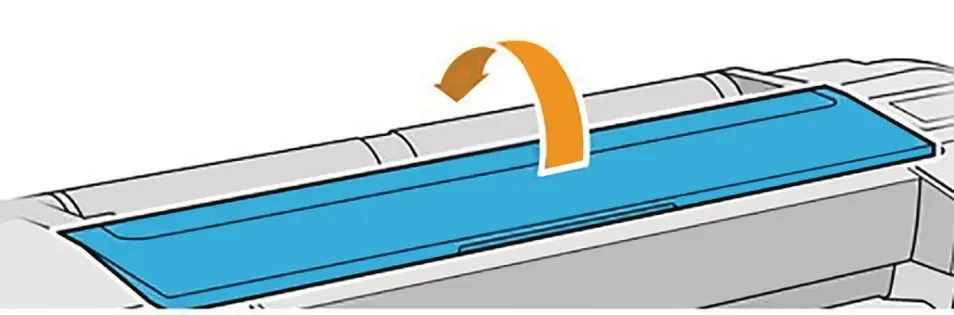
Campus Pro 24 and 44 assembly: 4.2 Install Printheads, photo 42
Step 4.2a: open the front window when the panel asks you to install printheads.
Campus Pro 24 and 44 assembly: 4.2 Install Printheads, photo 43
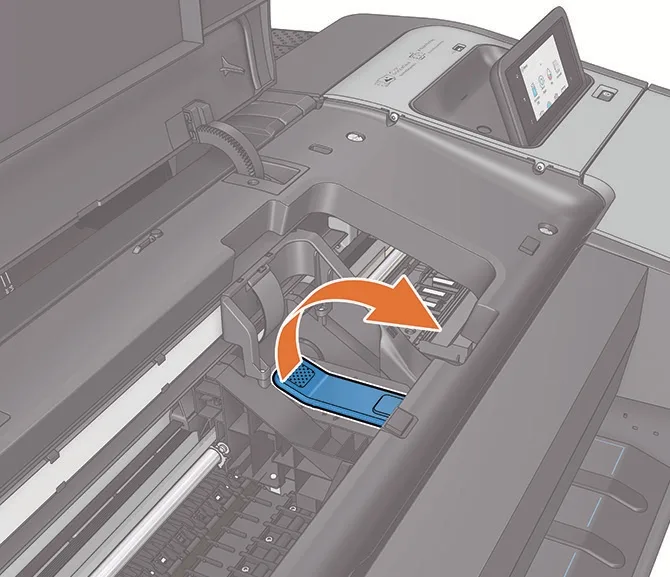
Pull the blue printhead cover handle up and toward you to release the latch.
Campus Pro 24 and 44 assembly: 4.2 Install Printheads, photo 44
Lift the printhead cover fully open to reach the factory setup printheads.

4.2a Open the printhead area when prompted.

  • When the front panel tells you, open the front window.
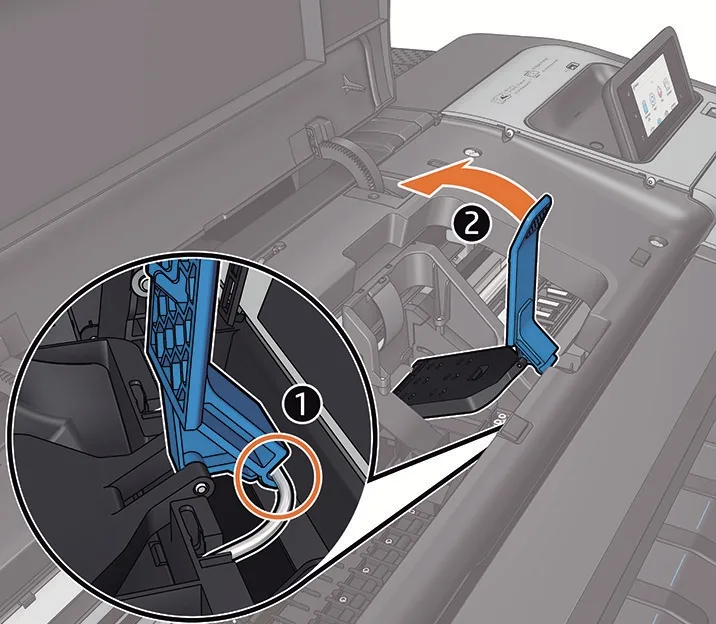
  • Pull the blue printhead-cover handle up and toward you to release the latch and open the cover.
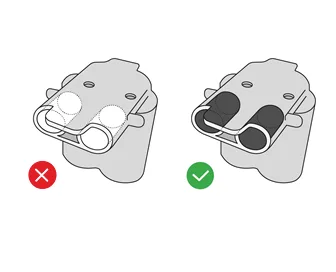
Campus Pro 24 and 44 assembly: 4.2 Install Printheads, photo 45
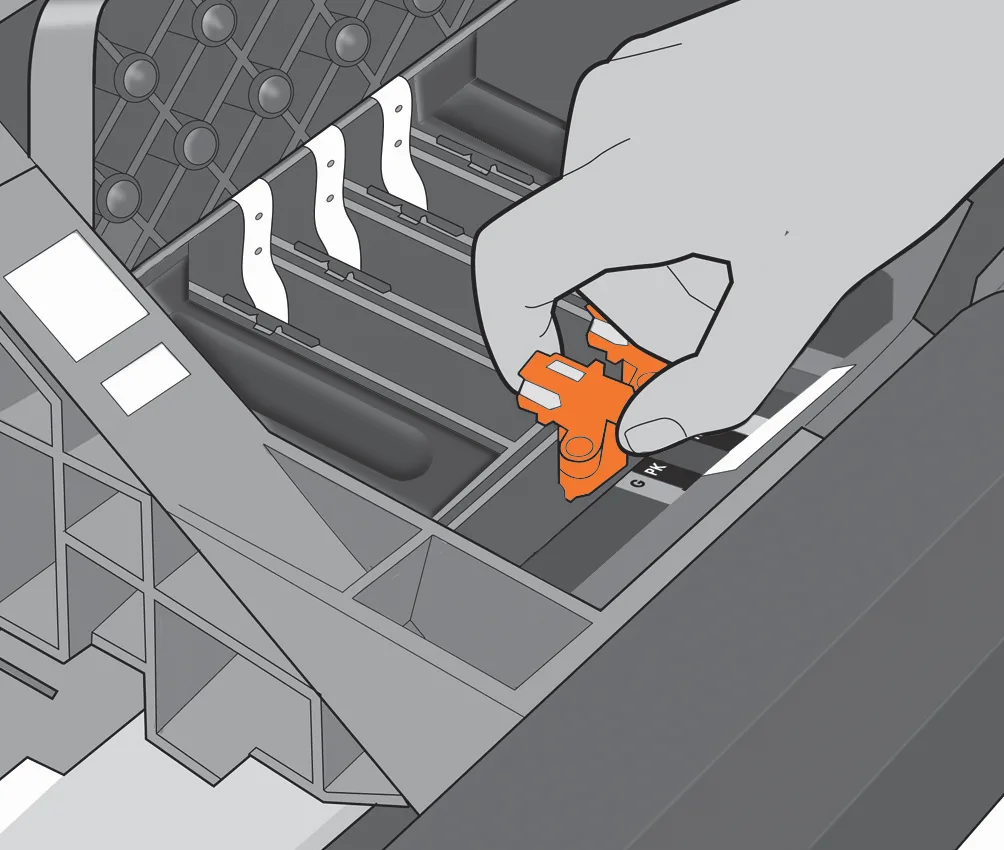
Step 4.2c: remove every orange protective part before installing a new printhead.
Campus Pro 24 and 44 assembly: 4.2 Install Printheads, photo 46
Step 4.2b: pull out and discard the setup printheads, avoiding the pins and circuits.
Campus Pro 24 and 44 assembly: 4.2 Install Printheads, photo 47
The front panel confirms when the ink system has finished starting up.

4.2b Remove the factory “setup” printheads.

  • Remove and discard all setup printheads.
  • You may need a bit of force to pull them out.
  • Setup printheads contain ink and can leak—avoid touching pins, leads, or circuits.
  • When all setup printheads are out, press Next on the front panel.
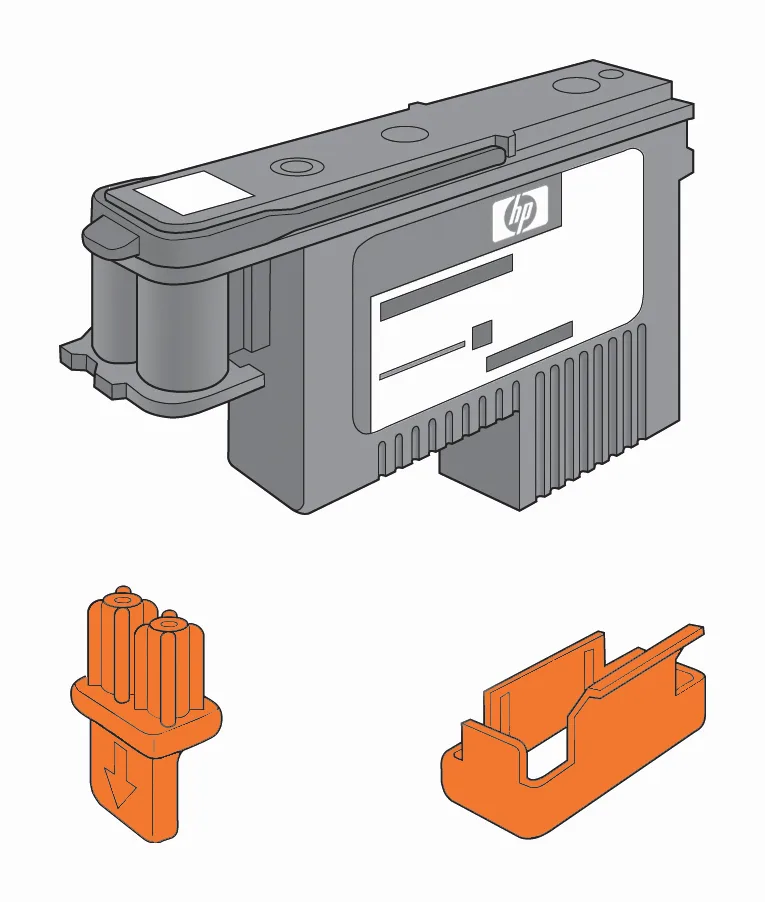
Campus Pro 24 and 44 assembly: 4.2 Install Printheads, photo 48
Unwrap each new printhead and set aside the orange protective caps and clips.
Campus Pro 24 and 44 assembly: 4.2 Install Printheads, photo 49
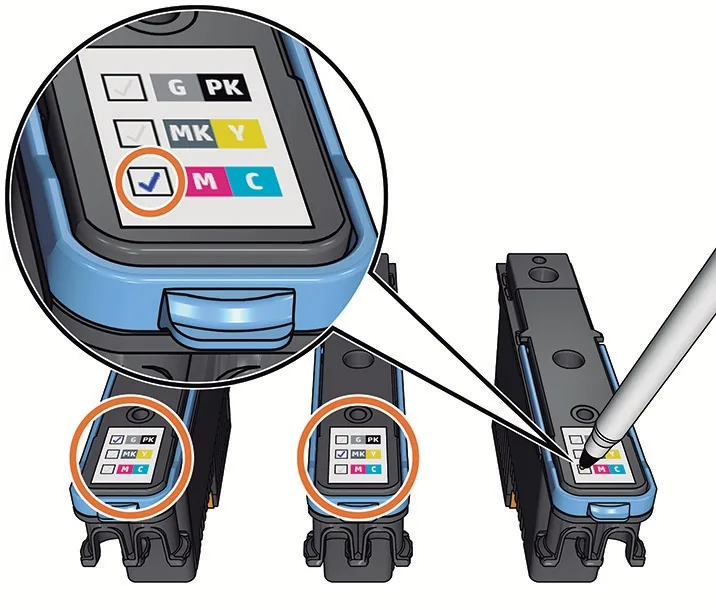
Label each printhead with its color pair, since it stays paired to the slot it first goes into.

4.2c Unpack new printheads.

  • Unwrap each new printhead and remove all orange protective parts.

Tip: A printhead can be inserted in any open slot, but once inserted it becomes paired to that color combination—so label each printhead with the color combo you intend to use.
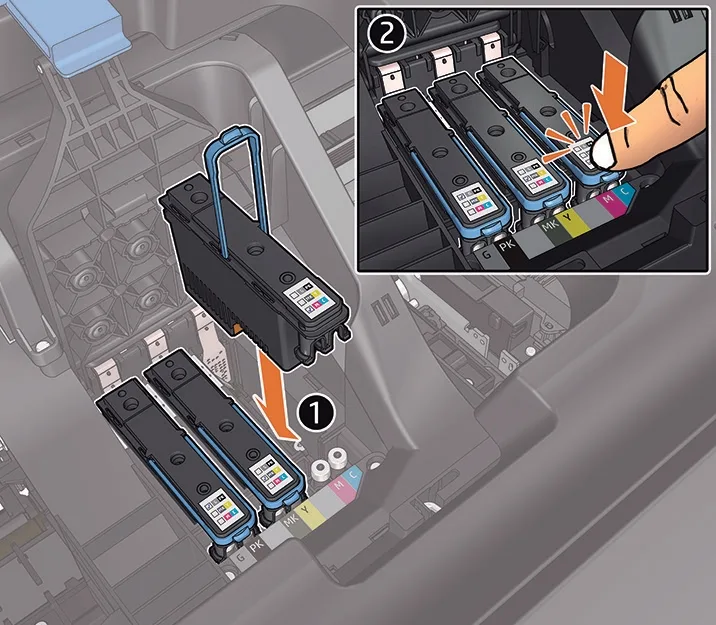
Campus Pro 24 and 44 assembly: 4.2 Install Printheads, photo 50
Step 4.2d: press each new printhead straight down into its slot until it clicks.
Campus Pro 24 and 44 assembly: 4.2 Install Printheads, photo 51
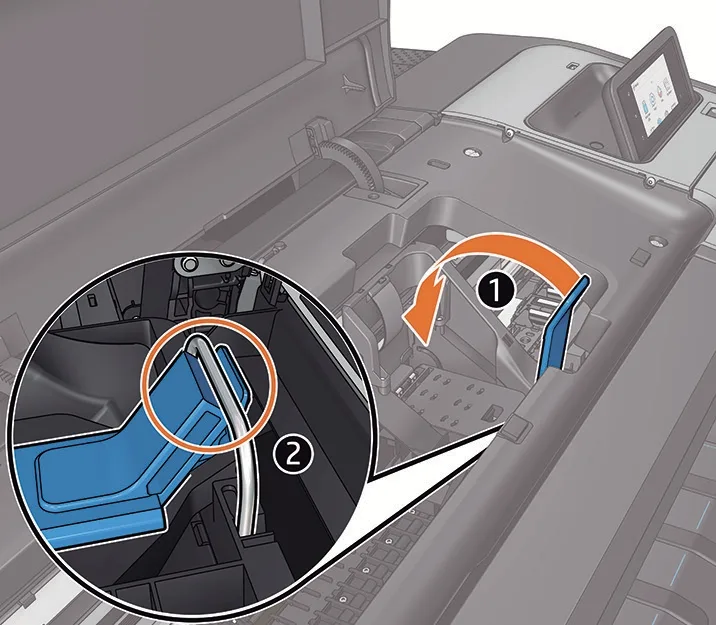
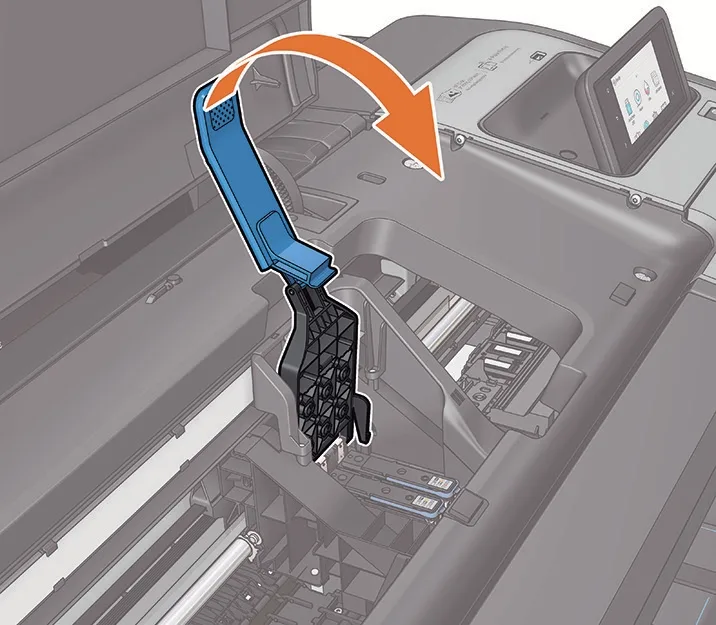
Hook the blue handle onto the small wire loop, then lower it onto the carriage cover.
Campus Pro 24 and 44 assembly: 4.2 Install Printheads, photo 52
Pull the handle down to close the printhead cover securely before continuing.

4.2d Insert new printheads.

  • Insert printheads one by one.
  • Press each printhead straight into its slot until it clicks into place.
  • To close: ensure the end of the blue handle engages the small wire loop on the near (outer) side of the carriage, then lower the handle so it rests on the carriage cover and pull the handle down to close.

4.3 Load Paper for Automatic Alignment
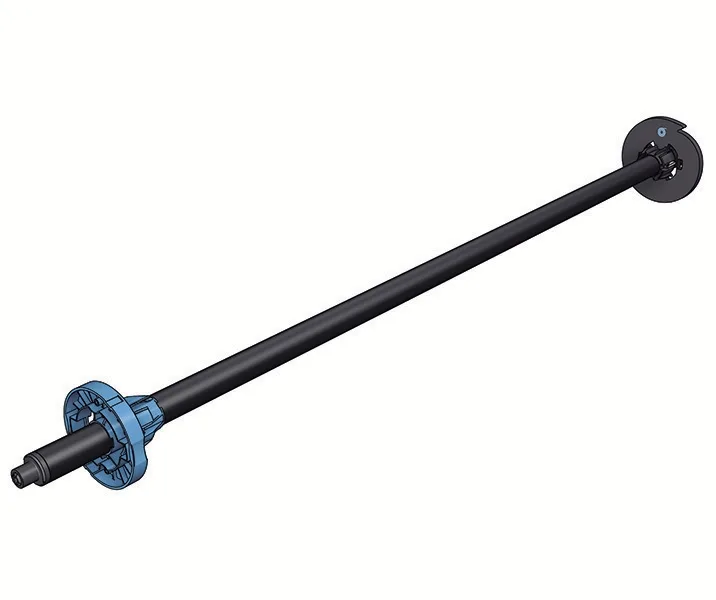
Campus Pro 24 and 44 assembly: 4.3 Load Paper for Automatic Alignment, photo 53
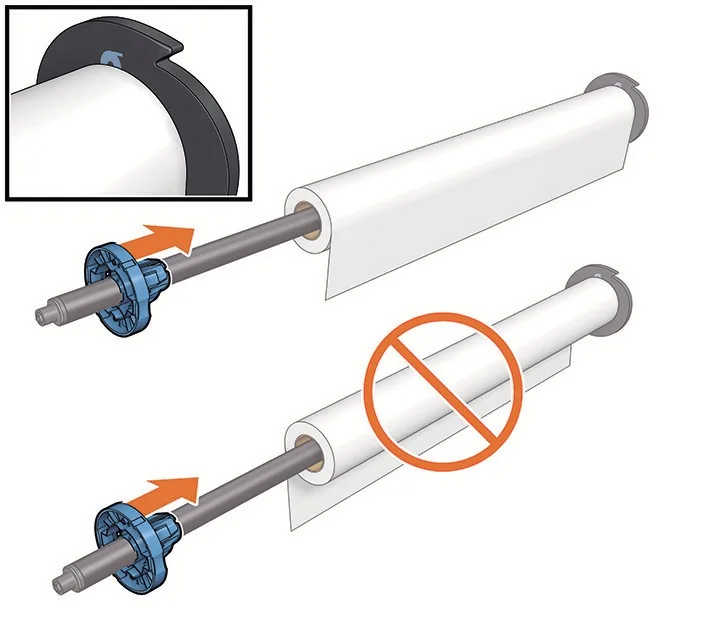
Step 4.3: the roll spindle holds the paper used for automatic printhead alignment.
Campus Pro 24 and 44 assembly: 4.3 Load Paper for Automatic Alignment, photo 54
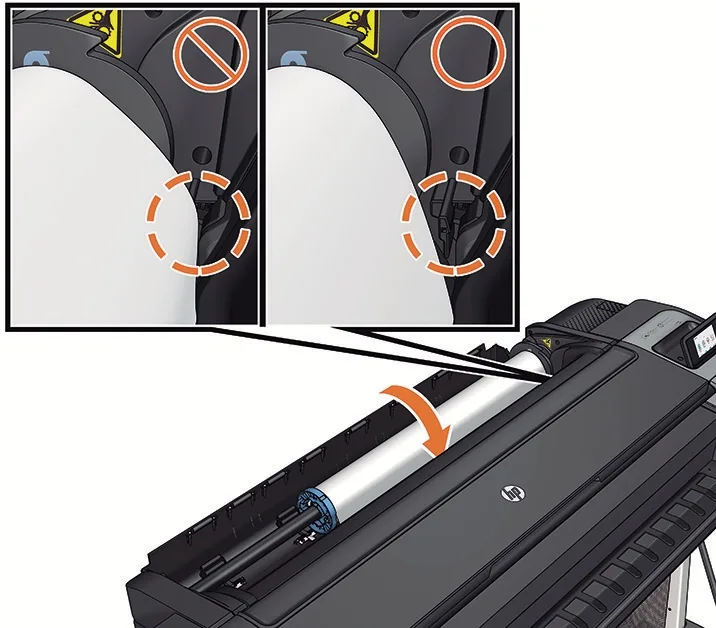
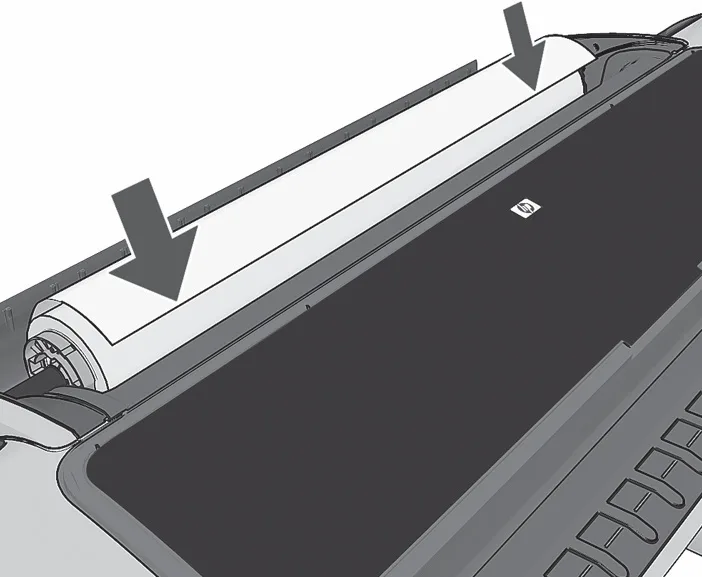
Load the roll so the paper unwinds in the correct direction, as shown on the spindle guide.
Campus Pro 24 and 44 assembly: 4.3 Load Paper for Automatic Alignment, photo 55
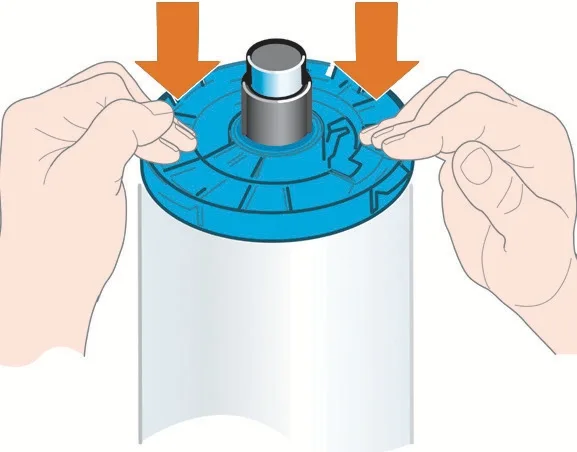
Press the blue hub firmly onto the end of the roll so it sits snug on the spindle.

4.3a Media width:

  • Use paper at least 15 in (381 mm) wide (roll recommended) so the printer can perform alignment.

4.3b Follow the panel prompts.

  • Feed the leading edge until the printer grips it. Do not use the cutsheet slot for roll media.
    Keep the roll cover open until the front panel tells you to close it.

4.3c Let alignment finish.

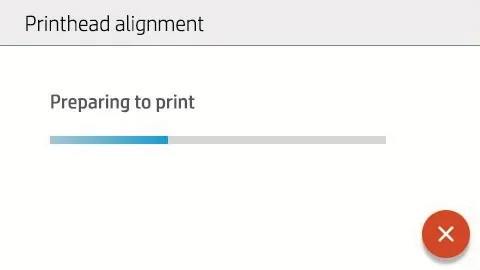
  • The panel will show alignment progress; no action is required until it completes.
Campus Pro 24 and 44 assembly: 4.3 Load Paper for Automatic Alignment, photo 56
Feed the leading edge of roll paper at least 15 inches wide until the printer grips it.
Campus Pro 24 and 44 assembly: 4.3 Load Paper for Automatic Alignment, photo 57
Keep the roll cover open until prompted, and never feed roll media through the cut-sheet slot.
Campus Pro 24 and 44 assembly: 4.3 Load Paper for Automatic Alignment, photo 58
Step 4.3c: the front panel shows alignment progress, and no action is needed until it finishes.

Quick Safety & Success Checks

  • If a printhead or cartridge isn’t recognized, reseat it firmly and check that no orange protective pieces remain.
  • If the cover won’t close, re-engage the blue handle with the wire loop, then lower and close.
  • Repeated alignment requests usually mean: media is too narrow or not loaded straight.

5) Software & Connectivity
Campus Pro 24 and 44 assembly: 5) Software & Connectivity, photo 59
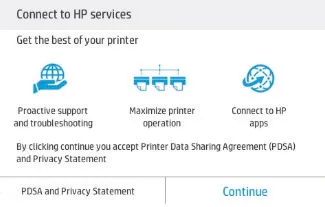
Step 5: the setup screens connect the poster maker to online services for support and updates.
Campus Pro 24 and 44 assembly: 5) Software & Connectivity, photo 60
Step 5.1: install the latest driver and utilities on a school computer to send posters to the printer.
Campus Pro 24 and 44 assembly: 5) Software & Connectivity, photo 61
Step 5.3: enabling network printing lets staff send posters from phones and tablets.

5.1 From a connected computer, install the latest Campus Pro driver and utilities from your support portal or the package our team provided.

5.2 Follow on-screen steps to add the printer on your network.

5.3 For mobile printing features, enable network connectivity on the printer and complete any required app or policy setup per your IT environment.

Troubleshooting & Tips

  • If a colored stand pin won’t seat, confirm R↔R and L↔L matching on legs and cross brace, and that basket supports are on the same side.
  • Wobble after assembly usually means inner-face screws weren’t tightened last. Square up the frame, then fully tighten all screws.
  • If the front panel doesn’t power on, recheck the power cable and outlet, wait 60 seconds, and try again.
  • If alignment is requested repeatedly, verify the media is ≥ 15 in (381 mm) and loaded straight.

Need help?

Every poster maker package includes remote setup and training on Zoom. If anything in these steps does not match what you see, stop and call us at 844-473-4700, 9 to 5 Eastern, Monday to Friday, or email info@schoolpostermakers.com.

Campus Pro 24 and 44,


Good questions

Don't see yours? Call 844-473-4700 or read every FAQ.

How long does it take to assemble a Campus Pro 24 or 44?

About 110 minutes with two or three people, including building the stand, mounting the printer, installing ink and printheads and running printhead alignment.

How heavy is a Campus Pro poster maker?

Approximate shipping weights are 70 kg (154 lb) for the 24-inch model and 90 kg (198 lb) for the 44-inch model, so have at least two people for lifting and turning.

What paper do I need for printhead alignment?

Paper at least 15 inches (381 mm) wide. Roll paper is recommended.

Can you help me set up my poster maker?

Yes. Every package includes remote setup and training on Zoom. Schedule a session on our setup support page or call 844-473-4700.

Trusted by schools in all 50 states,

Let's talk

844-473-4700info@schoolpostermakers.com · Monday to Friday, 9 to 5 EasternGet a written quote